
分享興趣,傳播快樂,增長見聞,留下美好!
親愛的您,這裏是LearningYard新學苑。
今天小編為你帶來
暢享聊:SolidWorks學習(4)
歡迎您的存取!
Share interests, spread happiness, increase knowledge, and leave beautiful!
Dear you, this is LearningYard Academy.
Today, the editor brings you
Changxiang Chat:SolidWorks Learning (4)
welcome your visit!

今天,我們一起來學習一下用SolidWorks畫一個簡單的愛心曲線模型,我們開啟SolidWorks軟件後,首先需要新建一個零件檔,進入界面以後,接著需要我們選擇一個基本的界面。我們可以選擇的前基準面也可以選擇其他的基準面,我們這裏選擇前視基準面。
Today, let's learn how to draw a simple love curve model using SolidWorks. After opening SolidWorks software, we first need to create a new part file. After entering the interface, we need to select a basic interface. We can choose either the front reference plane or other reference planes, and here we choose the front reference plane.
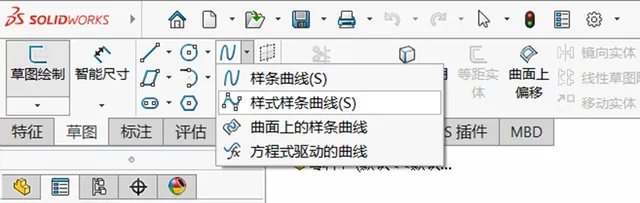
我們選擇好前視基準面以後,我們首選選擇樣式樣條曲線來進行繪制。我們先把這個愛心的側面輪廓給大致畫出來,值得註意的是,這裏我們先只畫愛心的一半,就像下面這樣。
After selecting the forward reference plane, our first choice is to choose a style spline curve for drawing. Let's first roughly outline the side profile of this love, and it's worth noting that we will only draw half of the love here, just like below.

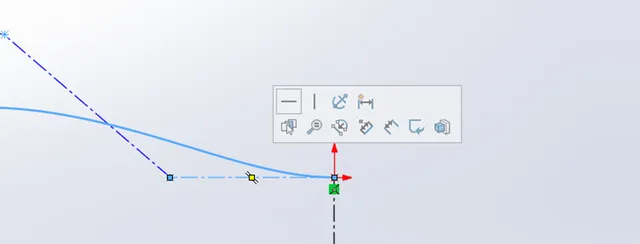
然後我們選擇中心線,將這個曲線的首和尾進行連線。之後再點選這個中心線,使它豎直。使上下兩端連線中心線的直線處於水平狀態,畫好後,我們可以透過拉動各個點位,對所畫的愛心半圖進行形狀調整,如下圖。
Then we select the centerline and connect the beginning and end of this curve. Then click on the centerline to make it vertical. Make the straight line connecting the center line at the upper and lower ends horizontal. After drawing, we can adjust the shape of the drawn heart-shaped half image by pulling various points, as shown in the following figure.


之後結束草圖,結束之後再次選擇草圖,選擇草圖基準面,這次我們選擇右視基準面。我們將在這個基準面上畫的是愛心模型的側面輪廓,我們同樣使用的是樣式樣條曲線,我們的愛心一般是上風比下方更加飽滿一點。
After exiting the sketch, select the sketch again and select the sketch reference plane. This time, we will select the right view reference plane. What we will draw on this benchmark is the side profile of the heart model, and we will also use style spline curves. Our heart is generally fuller on the upwind than below.
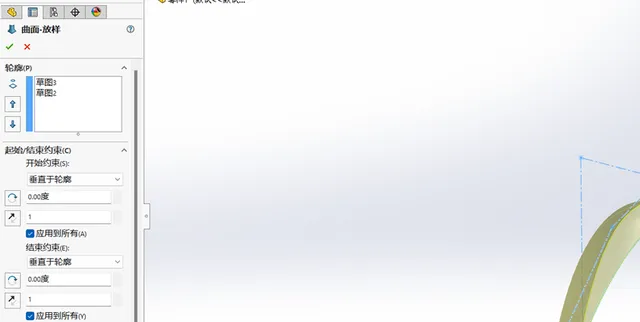
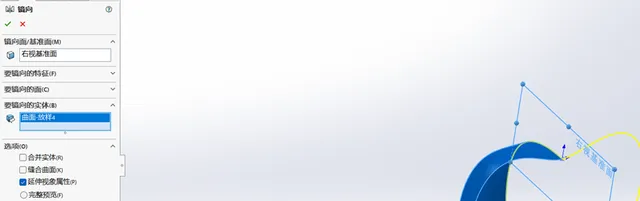
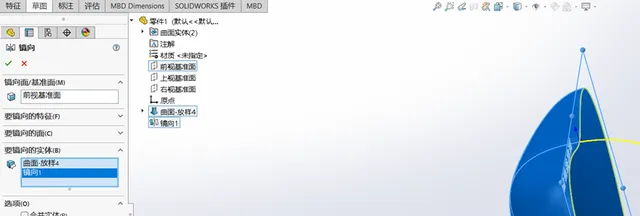
之後我們結束草圖,結束之後我們選擇曲面放樣,接著選擇我們剛才繪制的兩個草圖,將起始結束約束都改為垂直於輪廓,然後點左上方的勾進行確定。然後在右基準面選擇映像,點選要鏡向的實體,選擇我們所畫的圖形,點勾確定。然後再次進入鏡向,選擇前基準面,這次要鏡向的實體為剛才的兩部份,點選選擇,點勾確定。
Afterwards, we exit the sketch. After exiting, we choose surface layout, then select the two sketches we just drew, change the start and end constraints to be perpendicular to the contour, and click the tick in the upper left corner to confirm. Then select Mirror on the right reference plane, click on the entity you want to mirror, select the shape we have drawn, and click OK. Then enter mirror orientation again and select the front reference plane. This time, the entities to be mirror oriented are the two parts mentioned earlier. Click Select and click OK.
我們也可以給它加上自己喜歡的顏色。至此,一個簡單的心形曲面就畫好了。
We can also add our favorite colors to it. At this point, a simple heart-shaped surface is drawn.
今天的分享就到這裏了。
如果您對今天的文章有獨特的想法,
歡迎給我們留言,
讓我們相約明天,
祝您今天過得開心快樂!
That's it for today's sharing.
If you have a unique idea about today’s article,
Welcome to leave us a message,
Let us meet tomorrow,
I wish you a nice day today!
本文由learningyard新學苑原創,如有侵權,請聯系我們。
部份內容參考於bilibili,百度
轉譯來源:百度轉譯
文字&排版| calm
稽核| 歪歪


