1. 工具概述
Spacengine™ 是由 进迭时空 研发的一套 AI 算法模型部署工具,旨在帮助用户快速、高效的在进迭时空 RISC-V 系列芯片产品(以下简称 设备端 或 芯片端)上部署 AI 算法模型。Spacengine™ 依托进迭时空自研 AI 指令及量化技术,针对自研 X60、X100 等 RISC-V 系列芯片进行了深度性能优化,从而显著提升了常见算法模型在 芯片端 的推理性能。
1.1 工具总览
Spacengine™ 主要由工具集(Tools)、AI 引擎(Engine)以及示例包(Samples)构成:

Spacengine™ 工具集中的功能指令均以 spine 开头。您在部署过程中,主要涉及的指令包括:spine convert, spine simulate 以及 spine helper:
$ spine -husage: spine [-h] {convert,simulate,helper} ...Spacemit AI Toolkit(Version: 2024/01/15)positional arguments: {convert,simulate,helper}optional arguments: -h, --help show this help message and exit
其中:
spine convert 主要负责算法模型的一键转换和/或量化
spine simulate 提供 PC 端(当前仅限 x86)的模型仿真测试功能
spine helper 提供了一系列的辅助功能
【提示】相关 功能指令 及其子命令支持自动补全
得益于进迭时空智算核架构,Spacengine™ AI 引擎以轻量化插件的方式接入 ONNXRumtime 等开源框架,结合深度调优的加速后端,就可以成功的将模型高效的部署到我们的芯片上。目前主要包含 Runtime Library,Profiling 工具,Custom-Ops Plugin 等组件。
Spacengine™ 示例包为您提供了丰富的模型量化、推理运行代码示例,方便您快速、高效的对进迭时空 RISC-V 系列芯片进行评估和适配。其中,模型应用场景包括但不限于图像分类、目标检测、文字识别等,主干网络涉及但不限于 MobileNet、ResNet 等。
1.2 部署流程
配合 Spacengine™ 工具的 AI 模型部署流程,主要涉及模型转换、模型量化、仿真运行、模型部署(芯片端)这四个阶段:

转换工具目前支持 3. 模型转换章节。
为了提高模型在 芯片端 的运行性能、充分发挥芯片算力,我们强烈建议您将浮点模型量化为定点模型。量化后,大部分典型模型的精度损失都可以控制在 1% 以内。具体使用细节,您可以参阅 4. 模型量化章节。
对于转换或量化后的 ONNX 模型,您可以在 x86 平台上进行仿真推理测试。正常情况下,该推理结果与 芯片端 运行结果完全一致。您可以参阅 5. 仿真测试章节内容,了解更多使用细节。
当模型性能和精度都符合预期后,即可参考 6. 模型部署章节内容,实现 芯片端 具体上层应用的开发。
2. 快速上手
本章节主要介绍进迭时空 AI 部署工具的使用流程,以帮助您快速上手。
2.1 开发环境
当前,进迭时空为您提供 PC(x86_64) 端 Docker 和本地手动配置两种方式(二选一即可)。
【提示】我们强烈建议您选择 Docker 方式,以避免本地手动安装过程中出现问题。
2.1.1 Docker 环境使用
为了简化您的部署流程,进迭时空提供了包含完整开发环境的 Docker 镜像。您可以在相关 Docker 环境中,进行模型转换、量化、测试等工作。因此,您仅需要正确安装 Docker 环境即可。
$ sudo docker -vDocker version 24.0.7, build afdd53b
【提示】如果您无 root 权限,请联系您所使用 PC 设备的管理员,将您的用户名添加到 docker 用户组中。届时,您将不再需要 sudo 即可执行 docker 相关命令。
2.1.1.1 获取 Docker 镜像
您可以选择直接从 harbor.spacemit.com 的 spacemit-ai 项目中,拉取 spacemit-ai-sdk 相关镜像(注:x86_64 架构);也可以选择从 https://archive.spacemit.com/spacemit-ai/spacemit-ai-sdk/ 网站手动下载、导入压缩后的镜像文件。
【提示】出于带宽等因素考虑,我们推荐您采用 手动下载相关镜像 的方式。
$ sudo docker pull harbor.spacemit.com/spacemit-ai/spacemit-ai-sdk:latestlatest: Pulling from spacemit-ai/spacemit-ai-sdk...
【提示】如您需要特定版本的部署工具,操作时可将 latest 替换为指定版本号或其他标签(e.g. v1.0.0)。
$ wget https://archive.spacemit.com/spacemit-ai/spacemit-ai-sdk/spacemit-ai-sdk.v1.1.0.x86_64.img.tar.gz --no-check-certificate$ sudo docker load -i spacemit-ai-sdk.v1.1.0.x86_64.img.tar.gz
2.1.1.2 查看 Docker 镜像
$ sudo docker images | grep spacemit-ai-sdkREPOSITORY TAG IMAGE ID CREATED SIZEharbor.spacemit.com/spacemit-ai/spacemit-ai-sdk latest 4d239b86f5ea 3 days ago 3.83GB
2.1.1.3 创建 Docker 容器
$ NAME=ai_test # 给您的 docker 容器取个名称$ sudo docker run -itd --name $NAME --net=host harbor.spacemit.com/spacemit-ai/spacemit-ai-sdk:latest /bin/bash
【提示】如您打算挂载宿主机目录到容器中(e.g. 参数 -v <宿主机目录:容器目录>),请回避 /opt 目录(当前进迭时空 AI 部署工具预置文件夹路径)。
$ sudo docker ps -a | grep $NAMECONTAINER ID IMAGE COMMAND CREATED STATUS PORTS NAMES0a35d7feebd9 harbor.spacemit.com/spacemit-ai/spacemit-ai-sdk:latest "/bin/bash" 2 minutes ago Up 2 minutes ai_test
2.1.1.4 进入 Docker 容器
$ sudo docker exec -it $NAME /bin/bash
root@xxx:/home/workspace# spine...Spacemit AI Toolkit(Version: 2024/01/15)...
如您所见,相关输出即为当前 docker 开发环境中,进迭时空 AI 部署工具的版本信息。
【注意】当您第一次调用 spine 相关命令(及其子命令)时,spine 会自动为您安装必要的依赖包,故需要网络支持(正常情况下,该过程不会占用您太多时间)。
2.1.2 本地环境搭建
2.1.2.1 环境要求
操作系统:CentOS8 或者 Ubuntu18.04(及以上)
【提示】如果您不需要在 PC 端仿真测试,CentOS7 或者 Ubuntu16.04 即可满足环境要求。
2.1.2.2 获取部署工具
SDK 包下载页面:https://archive.spacemit.com/spacemit-ai/spacemit-ai-sdk/
$ wget https://archive.spacemit.com/spacemit-ai/spacemit-ai-sdk/spacemit-ai-sdk.v1.1.0.x86_64.tar.gz --no-check-certificate
2.1.2.3 安装部署工具
$ tar xzf spacemit-ai-sdk.v1.1.0.x86_64.tar.gz
$ tree -L 1 spacemit-ai-sdk.v1.1.0spacemit-ai-sdk.v1.1.0├── .spine.rc -> spine* // 工具集 环境配置脚本├── bianbu-ai-support // 上层应用开发支持库(及示例)├── quick_start* // 快速上手示例脚本├── install.sh* // 依赖环境安装脚本├── spacemit-gcc // x86_64-riscv64 编译器├── spacemit-ort // 推理引擎(含算子库)├── spacemit-qemu // x86_64-riscv64 模拟器├── spacengine* // 工具集 入口├── spacengine-toolkit // 工具集 Python 环境(paddle/tf2/onnx 等模型相关)├── spacengine-toolkit-caffe // 工具集 Python 环境(caffe 官方模型相关)├── spacengine-toolkit-tf1 // 工具集 Python 环境(tf1 模型相关)├── spacengine-wheel // 工具集 Python Wheel 包├── spacengine-xquant // 工具集 Python 环境(量化器)└── spine -> spacengine* // 工具集 入口(快捷)
$ bash install.sh
【提示】您可能需要 root 权限来执行相关依赖软件的安装。若您无法获取相关权限,您可以联系您当前使用设备的管理员协助安装,或使用进迭时空为您提供的 AI 部署工具 docker 镜像(参见 2.1 Docker 环境使用 章节内容)。
# cd spacemit-ai-sdk.v1.1.0$ source .spine.rc # 注: 仅对当前终端有效(您也可以编辑 ~/.bashrc 文件,使其对所有终端生效)
root@xxx:/home/workspace# spine...Spacemit AI Toolkit(Version: 2024/01/15)...
【注意】当您第一次调用 spine 相关命令(及其子命令)时,spine 会自动为您安装必要的依赖包,故需要网络支持(正常情况下,该过程不会占用您太多时间)。
2.1.3 快速验证
为方便您快速上手进迭时空 AI 部署工具,我们为您准备了 quick_start 脚本工具(SDK 根目录下)。您可以通过运行该工具,快速验证并熟悉 AI 模型部署的全流程。
$ quick_startUsage: /opt/spacemit-ai-sdk.v1.1.0/quick_start [paddle|demo|all]
其中,参数 paddle 指明快速演示 Paddle 相关模型部署流程(包括:资源下载、模型转换、模型量化、精度验证、仿真运行等);参数 demo 指明快速演示 C/C++ 应用程序编译、测试等流程;参数 all 指明快速演示所有任务(当前:paddle 和 demo)。
【说明】当您首次执行 quick_start paddle 或 quick_start all 时,脚本工具会自动下载并解压 quick_start.tar.gz 数据包(目录结构示例):
dataset/├── data│ └── Imagenet│ ├── Calib // 校准数据集│ ├── Test // 测试数据集│ ├── calib_list.txt // 校准数据列表│ └── test_label.txt // 测试数据标签└── paddle └── classification ├── infer.py // 推理测试脚本 └── resnet50 ├── inference.json // 量化配置文件 ├── inference.pdiparams └── inference.pdmodel
2.2 模型准备
以 quick_start 中的 Paddle 模型为例(其他框架模型类似,详情参阅 3. 模型转换章节内容),您也可以通过下述命令下载、解压示例模型:
$ wget https://bj.bcebos.com/paddle2onnx/model_zoo/resnet50.tar.gz && tar xvf resnet50.tar.gz$ tree resnet50resnet50├── inference.pdiparams└── inference.pdmodel0 directories, 2 files
2.3 模型转换(和量化)
spine convert 主要负责算法模型的一键转换和量化。以 quick_start 脚本工具中的 test_convert_paddle 任务为例,在开发环境中,通过执行下述 spine convert paddle 命令即可完成模型的一键转换:
$ spine convert paddle --model_dir resnet50 \ --model_filename inference.pdmodel \ --params_filename inference.pdiparams \ --save_file resnet50/inference.onnx[Paddle2ONNX] Start to parse PaddlePaddle model...[Paddle2ONNX] Model file path: resnet50/inference.pdmodel[Paddle2ONNX] Paramters file path: resnet50/inference.pdiparams[Paddle2ONNX] Start to parsing Paddle model...[Paddle2ONNX] Use opset_version = 9 for ONNX export.[Paddle2ONNX] PaddlePaddle model is exported as ONNX format now.
【说明】--model_dir 指定 Paddle 模型目录,--model_filename 指定 Paddle 模型文件,--params_filename 指定 Paddle 模型参数文件,--save_file 指定输出 ONNX 模型文件路径。您可以参阅 3. 模型转换章节内容,了解更多模型转换及参数介绍细节。
【提示】--config,-c 参数可以指定量化配置文件,从而进一步将浮点模型量化为定点模型:
$ spine convert paddle --model_dir resnet50 \ --model_filename inference.pdmodel \ --params_filename inference.pdiparams \ --save_file resnet50/inference.onnx \ --config resnet50/inference.json$ tree resnet50resnet50├── inference.json├── inference.onnx├── inference.pdiparams├── inference.pdmodel├── inference.q.onnx // 量化后模型文件└── inference.q_report.md // 量化分析报告
{ "model_parameters": { "onnx_model": "resnet50/inference.onnx", "output_model_file_prefix": "inference.q", "working_dir": "resnet50" }, "calibration_parameters": { "calibration_step": 500, "calibration_device": "cuda", "calibration_type": "default", "input_parametres": [ { "input_name": "inputs", "input_shape": [ 1, 3, 224, 224 ], "file_type": "img", "mean_value": [ 123.675, 116.28, 103.53 ], "std_value": [ 58.395, 57.12, 57.375 ], "preprocess_file": "IMAGENET", "data_list_path": "dataset/data/Imagenet/calib_list.txt" } ] }, "quantization_parameters": { "precision_level": 0 }}
其中,dataset 目录解压自 4. 模型量化章节内容。
2.4 精度验证
不同应用场景、领域下的精度评估指标各不相同。以 quick_start 中的 Paddle 分类模型为例,在开发环境中执行下述命令,可以在指定测试数据集上,快速对比、验证量化后模型的精度:
# eval converted onnx model(fp32)$ /opt/spacemit-ai-sdk.v1.1.0/spacengine-toolkit/bin/python3 -m pip install opencv-python -i https://pypi.tuna.tsinghua.edu.cn/simple$ /opt/spacemit-ai-sdk.v1.1.0/spacengine-toolkit/bin/python3 \ dataset/paddle/ classification/infer.py --model resnet50/inference.onnx \ --image_dir dataset/data/Imagenet/Test --label_path dataset/data/Imagenet/test_label.txtPrec@1 0.750 = 45 / 60Prec@5 0.967 = 58 / 60# eval quantized onnx model(int8)$ /opt/spacemit-ai-sdk.v1.1.0/spacengine-toolkit/bin/python3 \ dataset/paddle/ classification/infer.py --model resnet50/inference.q.onnx \ --image_dir dataset/data/Imagenet/Test --label_path dataset/data/Imagenet/test_label.txtPrec@1 0.750 = 45 / 60Prec@5 0.933 = 56 / 60
2.5 仿真测试
2.5.1 测试数据
spine helper test 提供创建标准 ONNX 测试数据集功能。以 quick_start 中的 test_simulate_paddle_qemu 函数及上述 Paddle 模型为例,在开发环境中运行下述命令:
$ spine helper test --model_path resnet50/inference.onnx --root_path test_data --test_name resnet50 -r 4 -f p2o.DynamicDimension.0:1 --save_output[INFO] create random test data under /home/workspace/test_data/resnet50/test_data_set_0 done[INFO] create random test data under /home/workspace/test_data/resnet50/test_data_set_1 done[INFO] create random test data under /home/workspace/test_data/resnet50/test_data_set_2 done[INFO] create random test data under /home/workspace/test_data/resnet50/test_data_set_3 done$ tree test_data/resnet50/test_data/resnet50/├── inference.onnx├── test_data_set_0│ ├── input_0.pb│ └── output_0.pb├── test_data_set_1│ ├── input_0.pb│ └── output_0.pb├── test_data_set_2│ ├── input_0.pb│ └── output_0.pb└── test_data_set_3 ├── input_0.pb └── output_0.pb4 directories, 9 files
【说明】--model_path 指定 ONNX 模型路径,--root_path 指定测试数据集根目录,--test_name 指定测试用例名称,-r 指定测试用例数量,-f 指定符号参数对应的 shape,--save_output 指定需要保存 x86 测试输出结果。更多参数细节,可以参阅 5.2.5 数据构建 章节内容。
2.5.2 仿真运行
spine simulate 提供 PC 端(当前仅限 x86 架构)的模型仿真测试功能。该功能基于 SDK 中预置的 qemu-riscv64 以及 x86_64-riscv64 交叉编译工具,支持标准 ONNX 模型及进迭时空 AI 部署工具量化后的模型,并保证推理结果与 芯片端 运行结果完全一致。以上述生成的测试数据集为例:
$ spine simulate test_data/resnet50/result: Models: 1 Total test cases: 4 Succeeded: 4 Not implemented: 0 Failed: 0 Stats by Operator type: Not implemented(0): Failed:Failed Test Cases:
【说明】spine simulate 封装了 SDK 目录下的 spacemit-ort/bin/onnx_test_runner 测试工具。如果测试用例目录下存在 标准 输出结果(e.g. spine helper test 构造测试数据时,通过 --save_output 指定保存 x86 输出结果),则 spine simulate test_data 命令还会对 芯片端 仿真测试输出结果进行精度比对(默认:相对误差 1e-5,绝对误差 1e-5)。更多参数细节,可以参阅 5.1.2 spine simulate 章节内容。
2.6 性能测试
SDK 目录下的 spacemit-ort/bin/onnxruntime_perf_test 工具支持在 芯片端 快速测试 AI 算法模型的纯推理性能。该工具兼容 ONNX 模型,故您可以很方便的使用它来评测原始 ONNX 浮点模型,以及转换(和/或量化)后的进迭时空定点模型性能。以上述量化后的 Paddle 模型为例,在 芯片端 执行下述命令:
bianbu@k1:~/desktop$ onnxruntime_perf_test inference.q.onnx -m times -r 100 -e spacemitusing SpaceMITExecutionProvider Session creation time cost: 2.74716 sFirst inference time cost: 85 msTotal inference time cost: 6.22935 sTotal inference requests: 100Average inference time cost: 62.2935 msTotal inference run time: 6.23146 sNumber of inferences per second: 16.0476 Total CPU usage: 382 %Peak working set size: 114634752 bytesMin Latency: 0.0529422 sMax Latency: 0.0912857 sP50 Latency: 0.0603562 sP90 Latency: 0.0741593 sP95 Latency: 0.0837052 sP99 Latency: 0.0912857 sP999 Latency: 0.0912857 s
【说明】-m times 指定测试模式为固定测试次数,-r 100 指定测试推理 100 次,-e spacemit 使能进迭时空后端加速。更多参数细节,可以参阅 6.1 性能测试 章节内容。
2.7 应用开发
Bianbu AI Support Library 是进迭时空自研的上层应用开发支持库,开箱即用,仅需一两行代码就可以轻松集成图像分类、目标检测等 AI 任务。
# 一键交叉编译$ cd spacemit-ai-sdk.v1.1.0/bianbu-ai-support/demo$ bash build.sh...[INFO] Building demos done.# 一键运行测试$ bash build.sh --test...[INFO] Prepare ...[INFO] Smoke test with image classification task ...[INFO] Run: build/ classification_demo data/models/squeezenet1.1-7.onnx data/labels/synset.txt data/imgs/dog.jpg... classify result: n02113023 Pembroke, Pembroke Welsh corgi...[INFO] Smoke test with object detection task ...[INFO] Run: build/detection_demo data/models/nanodet-plus-m_320.onnx data/labels/coco.txt data/imgs/person0.jpg result0.jpg...bbox[ 0] x1y1x2y2: (1346, 404,1525, 777), score: 0.727, label_text: personbbox[ 1] x1y1x2y2: (1476, 412,1598, 766), score: 0.605, label_text: personbbox[ 2] x1y1x2y2: ( 581, 447, 666, 706), score: 0.602, label_text: personbbox[ 3] x1y1x2y2: (1840, 430,1919, 654), score: 0.470, label_text: personbbox[ 4] x1y1x2y2: ( 459, 447, 551, 707), score: 0.462, label_text: personbbox[ 5] x1y1x2y2: ( 689, 468, 745, 601), score: 0.430, label_text: personbbox[ 6] x1y1x2y2: ( 660, 460, 722, 641), score: 0.401, label_text: person
【提示】您可以参阅 6.2.1.4 Demo 说明 章节内容,以了解更多现成 Demo 信息。您也可以参阅 6.2.2 AI Engine 章节相关介绍,了解进迭时空 AI 推理引擎的具体使用方式。
2.8 常见问题(FAQ)
2.8.1 部署工具有 windows 或 mac 版本吗?
答:暂时没有,未来可能会提供。
3. 模型转换
本章节主要介绍模型转换工具的使用细节。转换期间,工具会完成模型的格式转换、结构优化以及校准量化(如果您还指定了模型量化配置文件)等流程。转换完成后,工具将输出一个可以在进迭时空 芯片端 运行的模型。
【说明】
- (当前)进迭时空模型文件后缀名为 .onnx,兼容标准 ONNX 格式模型;
- 如果您还指定了模型量化配置文件,那您还将得到一个量化后的模型文件。
3.1 使用说明
$ spine convert -husage: spine convert [-h] {onnx,tf1,tf2,paddle,caffe} ...positional arguments: {onnx,tf1,tf2,paddle,caffe}optional arguments: -h, --help show this help message and exit
转换工具目前预置了 ONNX、TensorFlow、Paddle、Caffe 四种框架的模型格式转换支持。由于进迭时空 AI 推理引擎兼容 ONNX 模型格式(opset >= 7),故对于 Pytorch、MXNet 等其他框架下的模型,您可以通过先将模型转换成 ONNX 格式,再调用转换工具(详情可以参阅 3.1.5 其他模型 章节内容)。
3.1.1 ONNX 模型
除模型量化外,转换工具针对 ONNX 模型还提供了子图提取、shape 修改、模型文件检查等功能。
3.1.1.1 使用说明
$ spine convert onnx -husage: spine convert onnx [-h] --input INPUT --output OUTPUT [--checker] [--onnxsim] [--verbose] [--inputs INPUTS] [--outputs OUTPUTS] [--free_dim_param FREE_DIM_PARAM [FREE_DIM_PARAM ...]] [--free_dim_denotation FREE_DIM_DENOTATION [FREE_DIM_DENOTATION ...]] [--config CONFIG]optional arguments: -h, --help show this help message and exit --input INPUT input onnx model path --output OUTPUT output jdsk model path --checker enable onnx.checker.check_model --onnxsim enable onnxsim(https://github.com/daquexian/onnx-simplifier) to simplify the onnx model --verbose, -v verbose message, option is additive --inputs INPUTS expected input tensor names with shapes(option) --outputs OUTPUTS expected output tensor names with shapes(option) --free_dim_param FREE_DIM_PARAM [FREE_DIM_PARAM ...], -f FREE_DIM_PARAM [FREE_DIM_PARAM ...] [dimension_name:override_value] specify a value(must > 0) to override a free dimension by name(dim.dim_param). --free_dim_denotation FREE_DIM_DENOTATION [FREE_DIM_DENOTATION ...], -F FREE_DIM_DENOTATION [FREE_DIM_DENOTATION ...] [dimension_denotation:override_value] specify a value(must > 0) to override a free dimension by denotation(dim.denotation). --config CONFIG, -c CONFIG config file path for calibration
3.1.1.2 参数说明
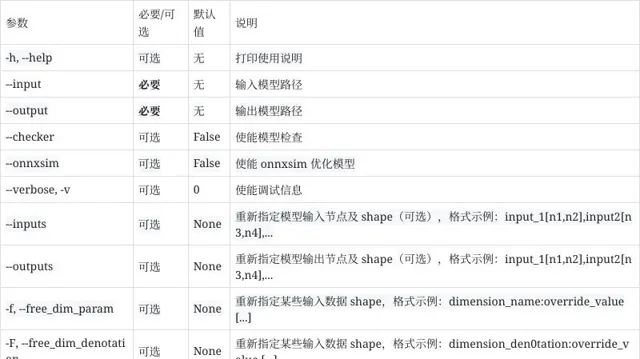
3.1.1.3 使用示例
3.1.1.3.1 提取模型 backbone
$ spine convert onnx --input yolov3-12.onnx \ --output yolov3-12-backbone.onnx \ --inputs input_1 \ --outputs Transpose__467:0,Transpose__469:0,Transpose__472:0
【提示】您可以通过 Netron 可视化工具,查看需要提取的网络的输入输出名称(及 shape)。
3.1.1.3.2 修改模型输入 shape
spine convert onnx 当前提供了两种方式来修改模型的输入和/或输出 shape 信息:
$ spine convert onnx --input yolov3-12.onnx \ --output yolov3-12-1x3x416x416.onnx \ --inputs input_1[1,3,416,416],image_shape[1,2]
【注意】通过 --inputs 和/或 --outputs 修改 shape 信息时,如果模型有多个输入(或输出),则您需要显示指定全部输入(或输出)的 shape 信息(即使其中某些输入或输出的 shape 信息您并没有修改)。否则,spine convert onnx 会理解为您想要提取模型中指定的网络结构。
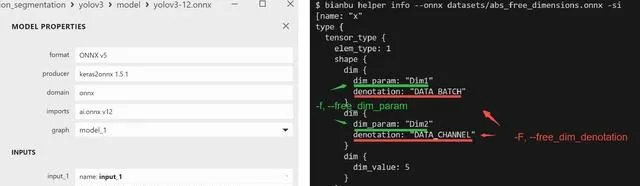
示例模型 abs_free_dimensions.onnx 链接:https://github.com/microsoft/onnxruntime/blob/v1.15.1/onnxruntime/test/testdata/abs_free_dimensions.onnx
$ spine convert onnx --input yolov3-12.onnx --output yolov3-12-1x3x416x416.onnx -f unk__577:416 unk__578:416$ spine convert onnx --input abs_free_dimensions.onnx -f Dim1:2 -F DATA_CHANNEL:3
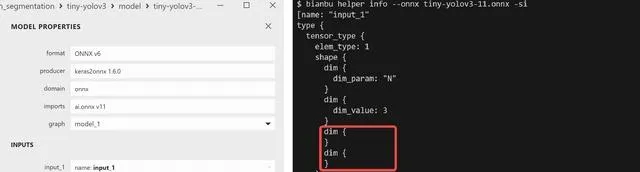
【注意】通过 -f, --free_dim_param 和/或 -F, --free_dim_denotation 修改 shape 信息时,您需要先通过 Netron 可视化工具或辅助功能指令 spine helper info 确定需要修改的目标 符号参数(e.g. 「unk__577」 和 「unk__578」)。如果 shape 信息中不存在 符号参数,您可以选择通过 --inputs 和/或 --outputs 方式修改 shape 信息。
附:符号参数说明
3.1.2 Tensorflow 模型
3.1.2.1 使用说明
以 tf2 为例(tf1 类似):
$ spine convert tf2 -husage: spine convert tf2 [-h] [--input INPUT] [--graphdef GRAPHDEF] [--saved-model SAVED_MODEL] [--tag TAG] [--signature_def SIGNATURE_DEF] [--concrete_function CONCRETE_FUNCTION] [--checkpoint CHECKPOINT] [--keras KERAS] [--tflite TFLITE] [--tfjs TFJS] [--large_model] --output OUTPUT [--inputs INPUTS] [--outputs OUTPUTS] [--ignore_default IGNORE_DEFAULT] [--use_default USE_DEFAULT] [--rename-inputs RENAME_INPUTS] [--rename-outputs RENAME_OUTPUTS] [--use-graph-names] [--opset OPSET] [--dequantize] [--custom-ops CUSTOM_OPS] [--extra_opset EXTRA_OPSET] [--load_op_libraries LOAD_OP_LIBRARIES] [--continue_on_error] [--verbose] [--debug] [--output_frozen_graph OUTPUT_FROZEN_GRAPH] [--inputs-as-nchw INPUTS_AS_NCHW] [--outputs-as-nchw OUTPUTS_AS_NCHW] [--config CONFIG]optional arguments: -h, --help show this help message and exit --input INPUT input from graphdef --graphdef GRAPHDEF input from graphdef --saved-model SAVED_MODEL input from saved model --tag TAG tag to use for saved_model --signature_def SIGNATURE_DEF signature_def from saved_model to use --concrete_function CONCRETE_FUNCTION For TF2.x saved_model, index of func signature in __call__ (--signature_def is ignored) --checkpoint CHECKPOINT input from checkpoint --keras KERAS input from keras model --tflite TFLITE input from tflite model --tfjs TFJS input from tfjs model --large_model use the large model format (for models > 2GB) --output OUTPUT output model file --inputs INPUTS model input_names (optional for saved_model, keras, and tflite) --outputs OUTPUTS model output_names (optional for saved_model, keras, and tflite) --ignore_default IGNORE_DEFAULT comma-separated list of names of PlaceholderWithDefault ops to change into Placeholder ops --use_default USE_DEFAULT comma-separated list of names of PlaceholderWithDefault ops to change into Identity ops using their default value --rename-inputs RENAME_INPUTS input names to use in final model (optional) --rename-outputs RENAME_OUTPUTS output names to use in final model (optional) --use-graph-names (saved model only) skip renaming io using signature names --opset OPSET opset version to use for onnx domain --dequantize remove quantization from model. Only supported for tflite currently. --custom-ops CUSTOM_OPS comma-separated map of custom ops to domains in format OpName:domain. Domain 'ai.onnx.converters.tensorflow' is used by default. --extra_opset EXTRA_OPSET extra opset with format like domain:version, e.g. com.microsoft:1 --load_op_libraries LOAD_OP_LIBRARIES comma-separated list of tf op library paths to register before loading model --continue_on_error continue_on_error --verbose, -v verbose output, option is additive --debug debug mode --output_frozen_graph OUTPUT_FROZEN_GRAPH output frozen tf graph to file --inputs-as-nchw INPUTS_AS_NCHW transpose inputs as from nhwc to nchw --outputs-as-nchw OUTPUTS_AS_NCHW transpose outputs as from nhwc to nchw --config CONFIG, -c CONFIG config file path for calibration
3.1.2.2 参数说明
-c, --config : 模型校准配置文件路径(详情参阅 4. 模型量化章节)其余参数同 Tensorflow-ONNX(tf2onnx) Parameters
【注意事项】:
- --input 参数同 --graphdef,输入模型文件名后缀通常为 pb
- --saved-model 对应的输入为文件夹,参考示例:
classification/inception_v3_tf2/├── saved_model.pb└── variables ├── variables.data-00000-of-00001 └── variables.index
3.1.2.3 使用示例
【提示】您可以参考 Tensorflow-ONNX(tf2onnx) Getting Started
3.1.3 Paddle 模型
3.1.3.1 使用说明
$ spine convert paddle -husage: spine convert paddle [-h] --model_dir MODEL_DIR [--model_filename MODEL_FILENAME] [--params_filename PARAMS_FILENAME] --save_file SAVE_FILE [--opset_version OPSET_VERSION] [--input_shape_dict INPUT_SHAPE_DICT] [--enable_dev_version ENABLE_DEV_VERSION] [--enable_onnx_checker ENABLE_ONNX_CHECKER] [--enable_paddle_fallback ENABLE_PADDLE_FALLBACK] [--version] [--output_names OUTPUT_NAMES] [--enable_auto_update_opset ENABLE_AUTO_UPDATE_OPSET] [--external_filename EXTERNAL_FILENAME] [--config CONFIG]optional arguments: -h, --help show this help message and exit --model_dir MODEL_DIR, -m MODEL_DIR PaddlePaddle model directory, if params stored in single file, you need define '--model_filename' and 'params_filename'. --model_filename MODEL_FILENAME, -mf MODEL_FILENAME PaddlePaddle model's network file name, which under directory seted by --model_dir --params_filename PARAMS_FILENAME, -pf PARAMS_FILENAME PaddlePaddle model's param file name(param files combined in single file), which under directory seted by --model_dir. --save_file SAVE_FILE, -s SAVE_FILE file path to save onnx model --opset_version OPSET_VERSION, -ov OPSET_VERSION set onnx opset version to export --input_shape_dict INPUT_SHAPE_DICT, -isd INPUT_SHAPE_DICT define input shapes, e.g --input_shape_dict="{'image':[1, 3, 608, 608]}" or--input_shape_dict="{'image':[1, 3, 608, 608], 'im_shape': [1, 2], 'scale_factor': [1, 2]}" --enable_dev_version ENABLE_DEV_VERSION whether to use new version of Paddle2ONNX which is under developing, default True --enable_onnx_checker ENABLE_ONNX_CHECKER whether check onnx model validity, default True --enable_paddle_fallback ENABLE_PADDLE_FALLBACK whether use PaddleFallback for custom op, default is False --version, -v get version of paddle2onnx --output_names OUTPUT_NAMES, -on OUTPUT_NAMES define output names, e.g --output_names="["output1"]" or --output_names="["output1", "output2", "output3"]" or --output_names="{"Paddleoutput":"Onnxoutput"}" --enable_auto_update_opset ENABLE_AUTO_UPDATE_OPSET whether enable auto_update_opset, default is True --external_filename EXTERNAL_FILENAME The filename of external_data when the model is bigger than 2G. --config CONFIG, -c CONFIG config file path for calibration
3.1.3.2 参数说明
-c, --config : 模型校准配置文件路径(详情参阅 4. 模型量化章节)其余参数同 Paddle2ONNX Parameters
3.1.3.3使用示例
# download and extract paddle test model$ wget https://bj.bcebos.com/paddle2onnx/model_zoo/mobilenetv3.tar.gz && tar xvf mobilenetv3.tar.gz# convert paddle model to onnx (without quantization)$ spine convert paddle --model_dir mobilenetv3 \ --model_filename inference.pdmodel \ --params_filename inference.pdiparams \ --save_file inference.onnx \ --enable_dev_version True
3.1.4 Caffe 模型
【提示】当前仅保证对标准 Caffe(GitHub) 模型的转换支持。
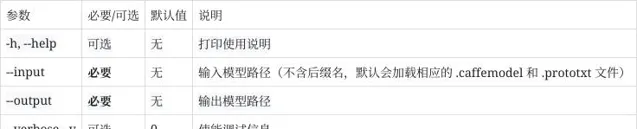
3.1.4.1 使用说明
$ spine convert caffe -husage: spine convert caffe [-h] --input INPUT --output OUTPUT [--verbose] [--config CONFIG]optional arguments: -h, --help show this help message and exit --input INPUT input caffe model path(basename) --output OUTPUT output jdsk model path --verbose, -v verbose message, option is additive --config CONFIG, -c CONFIG config file path for calibration
3.1.4.2 参数说明
3.1.4.3 使用示例
# download caffe test model$ wget http://dl.caffe.berkeleyvision.org/bvlc_alexnet.caffemodel$ wget https://github.com/BVLC/caffe/blob/master/models/bvlc_alexnet/deploy.prototxt -O bvlc_alexnet.prototxt# convert caffe model to onnx (without quantization)$ spine convert caffe --input bvlc_alexnet --output bvlc_alexnet.onnx -v
3.1.5 其他模型
由于进迭时空 AI 推理引擎兼容 ONNX 模型格式(opset >= 7),故对于 Pytorch、MXNet 等其他框架下的模型,您可以通过先将模型转换成 ONNX 格式,再调用转换工具:
3.2 自定义算子
3.2.1 ONNX 模型
请参阅 6. 模型部署中,AI 推理引擎 相关使用介绍。
3.2.2 其他模型
对于其他框架下的模型,我们建议您先将模型转换成 ONNX 模型格式,然后参照 3.2.1 ONNX 模型 章节处理。
4. 模型量化
本章节主要介绍模型量化工具的使用细节。进迭时空 RISC-V 系列芯片支持直接部署浮点(FP32)模型,但我们强烈建议您将浮点模型进一步量化为定点(INT8)模型。量化后模型的精度损失一般可以控制在 1% 以内,但推理性能却可以提升数十倍!
4.1 模型量化简介
XQuant 是基于 PPQ(0.6.6+) 开发的量化工具,集成了已经调整好的适配芯片的量化策略,使用 Json 配置文件调用统一接口实现模型量化。

4.2 量化工具说明
当前,模型量化功能已经被集成进 spine convert 命令中,您可以通过 -c 或 --config 选项指定相关量化配置文件路径。
【提示】量化工具安装包位于 SDK 中 spacengine-wheel/xquant 目录下,您也可以将其安装到指定的 Python 虚拟环境中。安装示例:
$ python3 -m pip install spacengine-wheel/xquant/xquant-1.1.0-py3-none-any.whl --extra-index-url https://pypi.ngc.nvidia.com
4.2.1 QuickStart
Python Code 以及 Shell 示例在 xquant_samples 中有源码,以便于快速开始模型量化
import xquantdemo_json = dict()# 以下缺省对demo_json内容的填入demo_json_path = "./demo_json.json"# 使用字典的方式xquant.quantize_onnx_model(demo_json)# 使用json文件的方式xquant.quantize_onnx_model(demo_json_path)# 支持API调用时传入模型路径或模型Proto# xquant.quantize_onnx_model("resnet18.json", "/home/share/modelzoo/ classification/resnet18/resnet18.onnx")# xquant.quantize_onnx_model(# "resnet18.json", "/home/share/modelzoo/ classification/resnet18/resnet18.onnx", "resnet18_output.onnx"# )# import onnx# onnx_model = onnx.load("/home/share/modelzoo/ classification/resnet18/resnet18.onnx")# quantized_onnx_model = xquant.quantize_onnx_model("resnet18.json", onnx_model)
python -m xquant --config ./demo_json.json# 指定输入以及输出模型路径# python -m xquant -c./demo_json.json -i demo.onnx -o demo.q.onnx
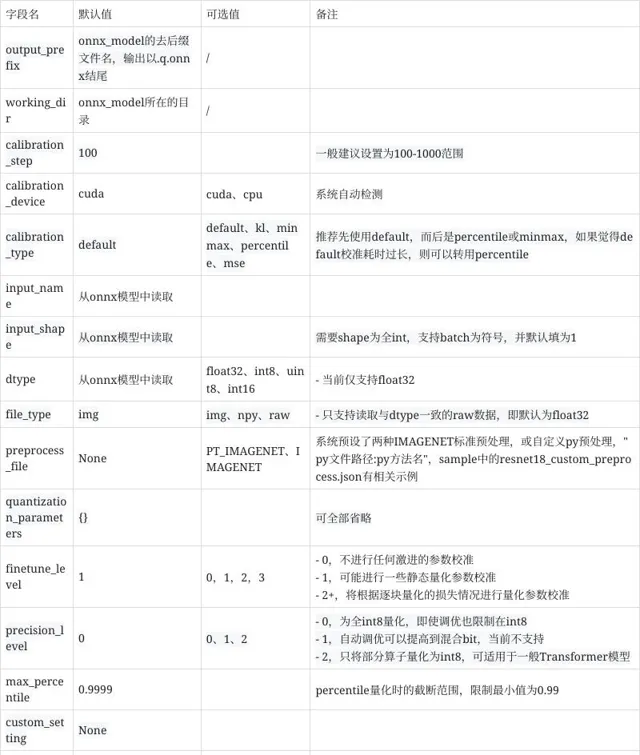
4.2.2 配置文件说明
{ "model_parameters" : { "onnx_model": "", "output_prefix": "", "working_dir": "", "skip_onnxsim": false }, "calibration_parameters" : { "calibration_step": 100, "calibration_device": "cpu", "calibration_type": "default", "input_parametres": [ { "input_name": "data", "input_shape": [1, 3, 224, 224], "dtype": "float32", "file_type": "img", "color_format": "bgr", "mean_value": [103.94, 116.78, 123.68], "std_value": [57, 57, 57], "preprocess_file": "", "data_list_path": "" }, { "input_name": "data1", "input_shape": [1, 3, 224, 224], "dtype": "float32", "file_type": "img", "mean_value": [103.94, 116.78, 123.68], "std_value": [57, 57, 57], "preprocess_file": "", "data_list_path": "" } ] }, "quantization_parameters": { "analysis_enable": true, "precision_level": 0, "finetune_level": 1, "max_percentile": 0.9999, "custom_setting": [ { "input_names": ["aaa", "bbb"], "output_names": ["ccc"], "max_percentile": 0.999, "precision_level": 2, "calibration_type": "default" } ], "truncate_var_names": ["/Concat_5_output_0", "/Transpose_6_output_0"] "截断模型" }}
img_list.txt 每行表示一个校准数据文件路径,可以写相对于 img_list.txt 所在目录的相对路径,也可以写绝对路径,如果模型是多输入的,请确保每个文件列表的顺序是对应的。
QuantZoo/Data/Imagenet/Calib/n01440764/ILSVRC2012_val_00002138.JPEGQuantZoo/Data/Imagenet/Calib/n01443537/ILSVRC2012_val_00000994.JPEGQuantZoo/Data/Imagenet/Calib/n01484850/ILSVRC2012_val_00014467.JPEGQuantZoo/Data/Imagenet/Calib/n01491361/ILSVRC2012_val_00003204.JPEGQuantZoo/Data/Imagenet/Calib/n01494475/ILSVRC2012_val_00015545.JPEGQuantZoo/Data/Imagenet/Calib/n01496331/ILSVRC2012_val_00008640.JPEG
例如这是一个 custom_preprocess.py 脚本文件,则在配置文件中将 preprocess_file 设为 custom_preprocess.py:preprocess_impl 指向具体 py 文件的具体方法,如果是多输入的情况,code 差距不大的情况下,可以直接复用自己的预处理方法。
如下采用的预处理方式,即为 preprocess_file=None 时的预处理,
from typing import Sequenceimport torchimport cv2import numpy as npdef preprocess_impl(path_list: Sequence[str], input_parametr: dict) -> torch.Tensor: """ 读取path_list, 并依据input_parametr中的参数预处理, 返回一个torch.Tensor Args: path_list (Sequence[str]): 一个校准batch的文件列表 input_parametr (dict): 等同于配置中的calibration_parameters.input_parametres[idx] Returns: torch.Tensor: 一个batch的校准数据 """ batch_list = [] mean_value = input_parametr["mean_value"] std_value = input_parametr["std_value"] input_shape = input_parametr["input_shape"] for file_path in path_list: img = cv2.imread(file_path) img = cv2.resize(img, (input_shape[-1], input_shape[-2]), interpolation=cv2.INTER_AREA) img = img.astype(np.float32) img = (img - mean_value) / std_value img = np.transpose(img, (2, 0, 1)) img = torch.from_numpy(img) img = torch.unsqueeze(img, 0) batch_list.append(img) return torch.cat(batch_list, dim=0)
以上这些特殊的工具使用方法,均在 samples 中有示例,可参考其中的 json 配置。
可参考 samples 中的 mobilenet_v3_small
"custom_setting": [ { "input_names": ["input_0"], "output_names": ["/features/features.1/block/block.0/block.0.0/Conv_output_0"], "precision_level": 2 } ]
工具采用计算图出入边包围子图的方式捕获一个子图并设置自定义量化参数,如下图示例,我们希望将计算图红框中的算子调整为 precision_level=2 的精度模式,则需要先确定当前子图的所有非常量出入边,即入边为子图内首个 Conv 的输入 n2,Add 的旁支输入 n7,出边为 Add 的输出 y

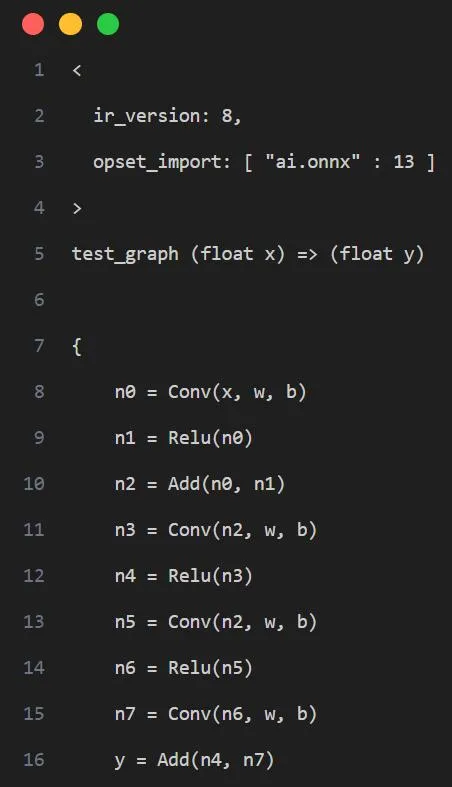
即产生如下的配置
"custom_setting": [ { "input_names": ["n2", "n7"], "output_names": ["y"], "precision_level": 2 } ]
truncate_var_names 支持将完整的带有后处理层的 ONNX 模型送入量化工具,量化产出模型也会保留后处理结构,但需要使用者指定模型主结构与后处理结构的分离点,即 truncate_var_names
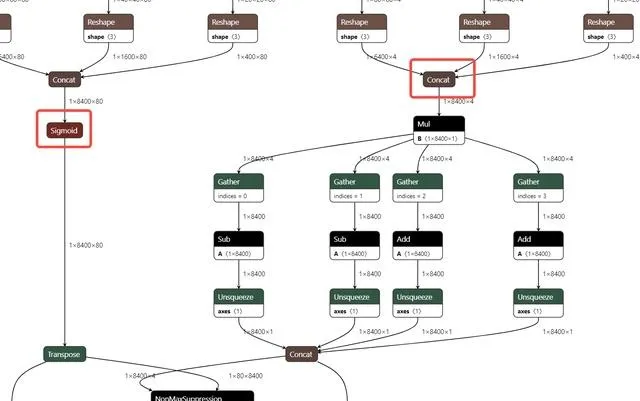
例如 yolov6p5_n 模型,只需要指定 Sigmoid、Concat(红框)算子的输出即可将模型二分,只量化上半部分。
4.2.3 量化输出说明
量化工具执行完毕后,将输出如下两个产物。
QDQ 格式的 ONNX 量化模型,由推理库解析为相应的量化算子并执行定点推理。
开启 analysis_enable 后,将在输出目录下生成量化分析文件,以 markdown 文件形式呈现
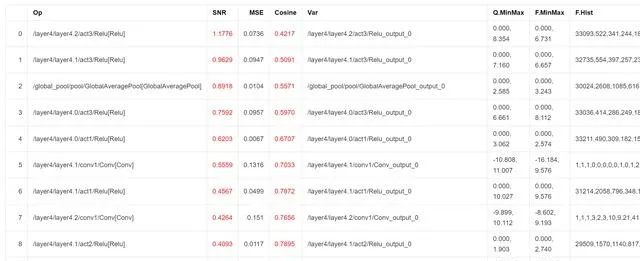
SNR 高于 0.1、Cosine 小于 0.99 的输出将被标记,如果某个模型标记输出过多,则可能产生量化误差,Cosine 低并不一定产生量化误差,SNR 的可信度更高,而上图所示的结果则表明该模型很可能不适合量化,或者需要特别调整量化参数
4.2.4 量化 Sample
为了使用户更加容易上手,我们提供了相应的量化 Sample。
可见 SDK 包中,spacengine-xquant/xquant_sample.tar.gz
4.3 常见问题(FAQ)
欢迎大家踊跃提问
4.3.1 配置相关
4.3.1.1 报错:Calibration input_parametres size should equal to model inputs size.
答: 当前配置 json 文件中设置的模型输入数量与模型真实的输入数量不一致。
4.3.1.2 报错:calibration_type xxx not implemented yet.
答:量化校准算法不支持,当前仅 default、minmax、percentile、kl、mse。
4.3.1.3 报错: file_type xxx not implemented yet.
答:量化校准数据集的文件格式不支持,当前仅支持图像、Npy、Raw 文件。
4.3.1.4 Calibration input xxx finds 0 items.
答: 校准数据集设置错误或找不到任何有效的校准数据,可能是数据路径错误或文件格式问题。
4.3.1.5 truncate graph failed.
答: 截断模型错误,可能量化配置 json 文件中,模型中 tensor 名称设置错了(不存在或拼写错误)。可以用 netron 打开模型文件,查看/确认目标输入 tensor 名称。也可能是当前设置的 tensor 名称不足以将模型一分为二。
4.3.2 精度相关
4.3.2.1 示例:量化后模型 PC 端和芯片端推理结果不一致
答:目前芯片端的算子实现,强调推理效率,可能与 x86 或其他平台有轻微差距,但在算子实现没有明显 bug 的情况下,其批量精度应当与其他平台一致。
4.3.2.2 示例:量化后模型 PC 端精度和芯片端实测不一致
答:一般认为,多平台间合理的批量精度差异在 ±0.5% 以内,如果出现芯片端精度明显降低(>2%)的情况,则大概率是芯片端推理时的计算 bug 导致,请及时向我们反馈。
4.3.3 性能相关
4.3.3.1 示例
INT8 量化后的 Resnet18 单核 @1.2GHz 时的推理耗时约为 FP32 的 52 倍,38ms vs 1992ms。
INT8 量化后的 MobileNetV2 单核 @1.2GHz 时的推理耗时约为 FP32 的 9.6 倍,45ms vs 431ms。
5. 仿真测试
本章节主要介绍 PC 端模型仿真、测试工具的使用细节。您可以使用 spine simulate 指令,在 x86 平台上对转换和/或量化后的算法模型进行仿真测试。正常情况下,该推理结果与 芯片端 运行结果完全一致。
5.1 使用说明
Spacengine™ AI 工具集提供了 Python 脚本 和 预编译二进制程序 两种方式来支持仿真运行、测试,功能指令分别为:
spine-py simulatespine simulate
5.1.1spine-py simulate
【注意】(当前)Python 端仿真测试基于 x86_64 公版 onnxruntime-cpu,故:
5.1.1.1 使用说明
【说明】spine-py(当前)为隐藏指令,需要用户手动创建(ln -sf spine spine-py)。
$ spine-py simulate -husage: spine-py simulate [-h] --input INPUT [--output OUTPUT] [--target {cpu} [{cpu} ...]] [--in_data IN_DATA] [--err_data ERR_DATA] [--eval_round EVAL_ROUND] [--intra_threads INTRA_THREADS] [--inter_threads INTER_THREADS] [--val_high VAL_HIGH] [--val_low VAL_LOW] [--inputs INPUTS] [--outputs OUTPUTS] [--free_dim_param FREE_DIM_PARAM [FREE_DIM_PARAM ...]] [--free_dim_denotation FREE_DIM_DENOTATION [FREE_DIM_DENOTATION ...]] [--max_batch_size MAX_BATCH_SIZE] [--min_batch_size MIN_BATCH_SIZE] [--meta_shape META_SHAPE] [--meta_data META_DATA] [--verbose] [--input2 INPUT2] [--output2 OUTPUT2] [--target2 {cpu} [{cpu} ...]] [--diff_max] [--atol ATOL] [--rtol RTOL]optional arguments: -h, --help show this help message and exit --input INPUT input model file path --output OUTPUT output data file path --target {cpu} [{cpu} ...] target platform(s), aka provider(s) --in_data IN_DATA input test data file path --err_data ERR_DATA error test data file path --eval_round EVAL_ROUND, -er EVAL_ROUND test round --intra_threads INTRA_THREADS intra_op_num_threads of onnxruntime session options --inter_threads INTER_THREADS inter_op_num_threads of onnxruntime session options --val_high VAL_HIGH, -vh VAL_HIGH maximum test data value(default: 1.0) --val_low VAL_LOW, -vl VAL_LOW minimum test data value(default: 0.0) --inputs INPUTS input tensor shape override for testing --outputs OUTPUTS output tensor shape override for testing(ignored at present) --free_dim_param FREE_DIM_PARAM [FREE_DIM_PARAM ...], -f FREE_DIM_PARAM [FREE_DIM_PARAM ...] [dimension_name:override_value] specify a value(must > 0) to override a free dimension by name(dim.dim_param). --free_dim_denotation FREE_DIM_DENOTATION [FREE_DIM_DENOTATION ...], -F FREE_DIM_DENOTATION [FREE_DIM_DENOTATION ...] [dimension_denotation:override_value] specify a value(must > 0) to override a free dimension by denotation(dim.denotation). --max_batch_size MAX_BATCH_SIZE maximum batch size for testing dynamic graph(default: 20) --min_batch_size MIN_BATCH_SIZE minimum batch size for testing dynamic graph(default: 1) --meta_shape META_SHAPE Meta function description for symbolic tensor shape or shape dimension value(integer) which <=0. Currently, at most one such opaque dimension in each shape could be supported. In such case, the dimension value will be computed as meta_func[idx](*args). The default meta funtion(i.e. meta_func[0]) is just like identity mapping f(*args): *args -> args[0], while args[0] is the dynamic random max_batch_size for the most time. For example, --meta_shape 1:2,3:1 means both input_shape[1] and input_shape[3] have an opaque dimension, and they should be computed as meta_func['2'](*args) = args[0] * args[1] and meta_func['1'](*args) = args[1] respectively. --meta_data META_DATA Meta data/arguments for meta function used in opaque dimension(e.g. symbolic tensor shape). For example, --meta_shape 1:2,3:1 --meta_data 1:8,3:4 means both input_shape[1] and input_shape[3] have an opaque dimension, and input_shape[1] should be computed as meta_func['2'](*args) = args[0] * args[1], where args[0] is actually the max_batch_size, and args[1] is '8' which specified in '--meta_data'. --verbose, -v additive option, -v: show verbose model info and save exception test data, -vv: print model outputs --input2 INPUT2 model2 input file path --output2 OUTPUT2 model2 output data file path --target2 {cpu} [{cpu} ...] model2 target platform(s), aka provider(s) --diff_max check maximum abs difference or not --atol ATOL absolute tolerance(default: 1e-4) --rtol RTOL relative tolerance(default: 0)
5.1.1.2 参数详解

5.1.1.3 使用示例
$ spine-py simulate --input demo/data/models/squeezenet1.1-7.onnx --eval_round 10

$ spine-py simulate --input demo/data/models/squeezenet1.1-7.onnx --eval_round 2 --input2 demo/data/models/squeezenet1.1-7.onnx --atol 1e-4 --rtol 0

【提示】两模型运行对比时,必须保证模型输入、输出一致。
5.1.2spine simulate
5.1.2.1 使用说明
预编译二进制程序(onnx_test_runner)位于 SDK 的 spacemit-ort/bin 目录下。spine simulate 命令是基于 SDK 中预置的 qemu-riscv64 以及 x86_64-riscv64 交叉编译工具,对该测试工具的进一步封装,支持量化后模型及标准 ONNX 模型,并保证推理结果与 芯片端 运行结果完全一致。
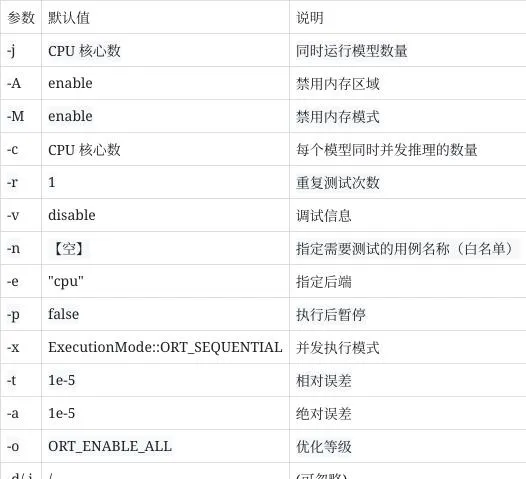
$ spine simulate -honnx_test_runner [options...] <data_root>Options: -j [models]: Specifies the number of models to run simultaneously. -A : Disable memory arena -M : Disable memory pattern -c [runs]: Specifies the number of Session::Run() to invoke simultaneously for each model. -r [repeat]: Specifies the number of times to repeat -v: verbose -n [test_case_name]: Specifies a single test case to run. -e [EXECUTION_PROVIDER]: EXECUTION_PROVIDER could be 'cpu', 'spacemit'. Default: 'cpu'. -p: Pause after launch, can attach debugger and continue -x: Use parallel executor, default (without -x): sequential executor. -d [device_id]: Specifies the device id for multi-device (e.g. GPU). The value should > 0 -t: Specify custom relative tolerance values for output value comparison. default: 1e-5 -a: Specify custom absolute tolerance values for output value comparison. default: 1e-5 -i: Specify EP specific runtime options as key value pairs. Different runtime options available are: [QNN only] [backend_path]: QNN backend path. e.g '/folderpath/libQnnHtp.so', '/folderpath/libQnnCpu.so'. [QNN only] [profiling_level]: QNN profiling level, options: 'basic', 'detailed', default 'off'. [QNN only] [rpc_control_latency]: QNN rpc control latency. default to 10. [Usage]: -e <provider_name> -i '<key1>|<value1> <key2>|<value2>' [Example] [For QNN EP] -e qnn -i "profiling_level|detailed backend_path|/folderpath/libQnnCpu.so" [SNPE only] [runtime]: SNPE runtime, options: 'CPU', 'GPU', 'GPU_FLOAT16', 'DSP', 'AIP_FIXED_TF'. [SNPE only] [priority]: execution priority, options: 'low', 'normal'. [SNPE only] [buffer_type]: options: 'TF8', 'TF16', 'UINT8', 'FLOAT', 'ITENSOR'. default: ITENSOR'. [Usage]: -e <provider_name> -i '<key1>|<value1> <key2>|<value2>' [Example] [For SNPE EP] -e snpe -i "runtime|CPU priority|low" -o [optimization level]: Default is 99. Valid values are 0 (disable), 1 (basic), 2 (extended), 99 (all). Please see onnxruntime_c_api.h (enum GraphOptimizationLevel) for the full list of all optimization levels. -h: helponnxruntime version: 1.15.1
5.1.2.2 参数详解
<data_root>为标准的 ONNX 测试数据目录,您可以参考 spine helper test 命令使用说明,快速创建相关测试数据集。目录结构示例:
$ tree test_data/caffe/test_data/caffe/├── [bvlc_alexnet](http://dl.caffe.berkeleyvision.org/bvlc_alexnet.caffemodel)│ ├── bvlc_alexnet.onnx│ └── test_data_set_0│ └── input_0.pb├── [bvlc_googlenet](http://dl.caffe.berkeleyvision.org/bvlc_googlenet.caffemodel)│ ├── bvlc_googlenet.onnx│ └── test_data_set_0│ └── input_0.pb...
5.1.2.3 使用示例
$ spine simulate test_data/caffe

5.2 辅助工具(可选)
除仿真工具外,spine helper 还为您提供了一系列辅助工具,以满足某些特定需求。
5.2.1 功能总览
$ spine helper -husage: spine helper [-h] {precision,npfile,info,test} ...positional arguments: {precision,npfile,info,test}optional arguments: -h, --help show this help message and exit
其中,
spine helper info 主要提供模型信息查看功能;
spine helper npfile 主要提供 npy/npz 数据查看功能;
spine helper precision 主要提供针对 txt/npy/npz 格式模型输出文件的精度对比功能;
spine helper test 主要提供创建标准 ONNX 测试数据集。
5.2.2 模型查看
$ spine helper info -husage: spine helper info [-h] [--onnx ONNX] [--graphdef GRAPHDEF] [--checkpoint CHECKPOINT] [--keras KERAS] [--show_node] [--show_input] [--show_output] [--to_ext_data] [--verbose]optional arguments: -h, --help show this help message and exit --onnx ONNX The input onnx model path. --graphdef GRAPHDEF The input tensorflow protobuf model path. --checkpoint CHECKPOINT The input tensorflow checkpoint meta path. --keras KERAS The input tensorflow keras p filepath. --show_node, -sn Display model graph nodes. --show_input, -si Display model graph inputs. --show_output, -so Display model graph outputs. --to_ext_data, -ext Convert model to external data(ONNX only). --verbose, -v verbose output, option is additive
【注意】spine helper info 当前仅支持查看 ONNX、TF Graphdef(pb)、TF CheckPoint、Keras 格式模型。
5.2.2.1 参数说明

5.2.2.2 使用示例
$ spine helper info --onnx yolov3-12.onnx -si -so -sn
$ spine helper info --graphdef frozen.pb -si -so -sn
5.2.3 数据查看
$ spine helper npfile -husage: spine helper npfile [-h] filepositional arguments: file npy/npz data file pathoptional arguments: -h, --help show this help message and exit
5.2.3.1 参数说明
5.2.3.2 使用示例
$ spine helper npfile arr1.npyword_size: 16, num_vals: 524288, shape: (64,64,128)
$ spine helper npfile out.npzkey: myVar1, word_size: 8, num_vals: 1, shape: (1)key: myVar2, word_size: 1, num_vals: 1, shape: (1)key: arr1, word_size: 16, num_vals: 262144, shape: (32,64,128)
5.2.4 数据比对
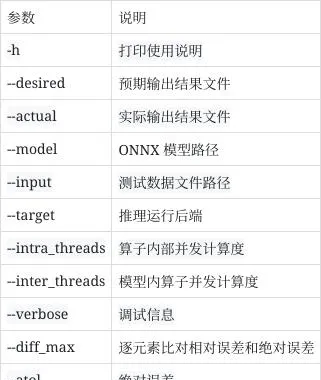
$ spine helper precision -husage: spine helper precision [-h] --desired DESIRED [--actual ACTUAL] [--model MODEL] [--input INPUT] [--target {cpu} [{cpu} ...]] [--intra_threads INTRA_THREADS] [--inter_threads INTER_THREADS] [--verbose] [--diff_max] [--atol ATOL] [--rtol RTOL]optional arguments: -h, --help show this help message and exit --desired DESIRED expected output data file path(txt/npz). For txt file, always suppose the dtype is float. --actual ACTUAL actual output data file path(txt/npz). For txt file, always suppose the dtype is float. --model MODEL input model file path(onnx) --input INPUT input test data file path(txt/npz) --target {cpu} [{cpu} ...] target platform(s), aka provider(s) --intra_threads INTRA_THREADS intra_op_num_threads of onnxruntime session options --inter_threads INTER_THREADS inter_op_num_threads of onnxruntime session options --verbose, -v additive option, -v: show verbose info, -vv: print outputs --diff_max check maximum abs difference or not --atol ATOL absolute tolerance(default: 1e-4) --rtol RTOL relative tolerance(default: 0)
5.2.4.1 参数说明
5.2.4.2 使用示例
# check desired output with actual output directly(both npz and txt format are available)$ spine helper precision --desired desired.npz --actual actual.txt# check desired output and actual output with given tolerance$ spine helper precision --desired desired.npz --actual actual.npz --atol 1e-5 --rtol 0# check desired output with onnx model and input data$ spine helper precision --desired desired.txt --model model.onnx --input data.npz
5.2.5 数据构建
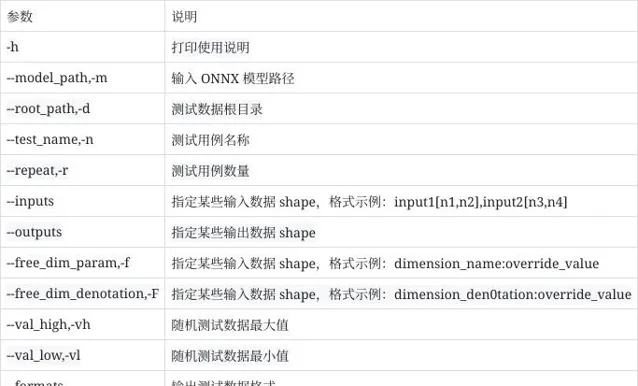
$ spine helper test -husage: spine helper test [-h] --model_path MODEL_PATH --root_path ROOT_PATH --test_name TEST_NAME [--repeat REPEAT] [--inputs INPUTS] [--outputs OUTPUTS] [--free_dim_param FREE_DIM_PARAM [FREE_DIM_PARAM ...]] [--free_dim_denotation FREE_DIM_DENOTATION [FREE_DIM_DENOTATION ...]] [--val_high VAL_HIGH] [--val_low VAL_LOW] [--formats {pb,npz} [{pb,npz} ...]] [--save_output]optional arguments: -h, --help show this help message and exit --model_path MODEL_PATH, -m MODEL_PATH Path to the onnx model file to use. --root_path ROOT_PATH, -d ROOT_PATH Root path to create the test directory in. --test_name TEST_NAME, -n TEST_NAME Name for test. Will be added to the root_path to create the test directory name. --repeat REPEAT, -r REPEAT Repeat times. --inputs INPUTS input tensor shape override for testing --outputs OUTPUTS output tensor shape override for testing(ignored at present) --free_dim_param FREE_DIM_PARAM [FREE_DIM_PARAM ...], -f FREE_DIM_PARAM [FREE_DIM_PARAM ...] [dimension_name:override_value] specify a value(must > 0) to override a free dimension by name(dim.dim_param). --free_dim_denotation FREE_DIM_DENOTATION [FREE_DIM_DENOTATION ...], -F FREE_DIM_DENOTATION [FREE_DIM_DENOTATION ...] [dimension_denotation:override_value] specify a value(must > 0) to override a free dimension by denotation(dim.denotation). --val_high VAL_HIGH, -vh VAL_HIGH maximum test data value(default: 1.0) --val_low VAL_LOW, -vl VAL_LOW minimum test data value(default: 0.0) --formats {pb,npz} [{pb,npz} ...] Output tensor file type. --save_output Save output or not
5.2.5.1 参数说明
【注意】由于 --save_output 依赖 PC 端模型推理(基于 x86 onnxruntime-cpu),故部分量化后的模型可能不支持该参数选项。
5.2.5.2 使用示例
$ spine helper test --model_path dataset/paddle/detection/picodet_l_640_coco/model.onnx --root_path test_data --test_name picodet_l_640_coco -r 1 -f p2o.DynamicDimension.0:1$ tree /home/workspace/test_data/picodet_l_640_coco

6. 模型部署
本章节主要介绍如何在进迭时空 RISC-V 系列芯片产品(开发板、笔记本等)上,部署 AI 算法模型或进行相关 AI 应用开发。
6.1 性能测试
【提示】在正式部署 AI 模型前,我们强烈建议您先在 芯片端 进行相关模型的性能测试,以确保当前模型的推理性能符合预期。
SDK 目录下的 spacemit-ort/bin/onnxruntime_perf_test 工具支持在 芯片端 快速测试 AI 算法模型的纯推理性能。该工具兼容 ONNX 模型,故您可以很方便的使用它来评测原始 ONNX 浮点模型,以及转换(和/或量化)后的 ONNX 定点模型性能。
6.1.1 使用说明
$ onnxruntime_perf_test -hperf_test [options...] model_path [result_file]Options: -m [test_mode]: Specifies the test mode. Value could be 'duration' or 'times'. Provide 'duration' to run the test for a fix duration, and 'times' to repeated for a certain times. -M: Disable memory pattern. -A: Disable memory arena -c [parallel runs]: Specifies the (max) number of runs to invoke simultaneously. Default:1. -e [cpu|spacemit]: Specifies the provider 'cpu', 'spacemit'. Default:'cpu'. -r [repeated_times]: Specifies the repeated times if running in 'times' test mode.Default:1000. -t [seconds_to_run]: Specifies the seconds to run for 'duration' mode. Default:600. -p [profile_file]: Specifies the profile name to enable profiling and dump the profile data to the file. -s: Show statistics result, like P75, P90. If no result_file provided this defaults to on. -S: Given random seed, to produce the same input data. This defaults to -1(no initialize). -v: Show verbose information. -x [intra_op_num_threads]: Sets the number of threads used to parallelize the execution within nodes, A value of 0 means ORT will pick a default. Must >=0. -y [inter_op_num_threads]: Sets the number of threads used to parallelize the execution of the graph (across nodes), A value of 0 means ORT will pick a default. Must >=0. -f [free_dimension_override]: Specifies a free dimension by name to override to a specific value for performance optimization. Syntax is [dimension_name:override_value]. override_value must > 0 -F [free_dimension_override]: Specifies a free dimension by denotation to override to a specific value for performance optimization. Syntax is [dimension_denotation:override_value]. override_value must > 0 -P: Use parallel executor instead of sequential executor. -o [optimization level]: Default is 99 (all). Valid values are 0 (disable), 1 (basic), 2 (extended), 99 (all). Please see onnxruntime_c_api.h (enum GraphOptimizationLevel) for the full list of all optimization levels. -u [optimized_model_path]: Specify the optimized model path for saving. -z: Set denormal as zero. When turning on this option reduces latency dramatically, a model may have denormals. -T [Set intra op thread affinities]: Specify intra op thread affinity string [Example]: -T 1,2;3,4;5,6 or -T 1-2;3-4;5-6 Use semicolon to separate configuration between threads. E.g. 1,2;3,4;5,6 specifies affinities for three threads, the first thread will be attached to the first and second logical processor. The number of affinities must be equal to intra_op_num_threads - 1 -D [Disable thread spinning]: disable spinning entirely for thread owned by onnxruntime intra-op thread pool. -H: Maximum value to produce the random input data. This defaults to -1(as std::numeric_limits<T>::max() whenever the value given by this option less than value of '-L'). -L: Minimum value to produce the random input data. This defaults to 0. -R: Count of random generated input test data. This defaults to 1 and must > 0. -U: Maximum value to produce the random value of free dimensions which are not overriden. This defaults to 1. Specified value must > 0. -V: Minimum value to produce the random value of free dimensions which are not overriden. This defaults to 1. Specified value must > 0. -Z [Force thread to stop spinning between runs]: disallow thread from spinning during runs to reduce cpu usage. -h: help
6.1.2 参数说明

6.1.3 使用示例
以 onnxruntime/test/testdata/abs_free_dimensions.onnx 模型为例:
6.1.3.1 随机测试数据
$ MODEL=abs_free_dimensions.onnx$ ARGS="${MODEL} ${MODEL%.onnx}.txt -m times -r 100 -R 10 -S 1 -H 6 -L 2"$ onnxruntime_perf_test ${ARGS}...Session creation time cost: 0.0455992 sFirst inference time cost: 0 msTotal inference time cost: 0.00371454 sTotal inference requests: 100Average inference time cost: 0.0371454 msTotal inference run time: 0.00417042 sNumber of inferences per second: 23978.4 ...
6.2 应用开发
6.2.1 AI Support Library
为减轻您在相关应用上的开发工作,进迭时空已经在部署工具 SDK 包中预置了 AI Support Library。这是一个基于 OnnxRuntime 的上层应用开发支持库,开箱即用,仅需一两行代码就可以轻松集成图像分类、目标检测等 AI 任务。
6.2.1.1 Demo 简介
当前 Support Library Demo 位于部署工具包中 bianbu-ai-support 目录下,相关说明及示例如下:
$ tree -L 3 /opt/spacemit-ai-sdk.v1.1.0/bianbu-ai-support//opt/spacemit-ai-sdk.v1.1.0/bianbu-ai-support/├── bin // 预编译好的可执行程序│ ├── classification_demo│ ├── detection_demo│ ├── detection_stream_demo│ ├── detection_video_demo│ ├── estimation_demo│ └── tracker_stream_demo├── demo // demo cmake 工程│ ├── CMakeLists.txt│ ├── README.md│ ├── build.sh // 快速编译(及测试)脚本│ ├── dataloader.hpp│ ├── image_ classification_demo.cc│ ├── object_detection.hpp│ ├── object_detection_demo.cc│ ├── object_detection_stream_demo.cc│ ├── object_detection_video_demo.cc│ ├── pose_estimation.hpp│ ├── pose_estimation_demo.cc│ ├── pose_tracker_stream_demo.cc│ └── utils│ ├── cv_helper.hpp│ ├── json.hpp│ ├── json_helper.hpp│ └── win_getopt├── include // 预处理、后处理、辅助函数等模块│ └── bianbuai│ ├── task│ └── utils├── lib│ ├── 3rdparty // 第三方依赖库│ │ └── opencv4│ ├── libbianbuai.so -> libbianbuai.so.1│ ├── libbianbuai.so.1 -> libbianbuai.so.1.0.15│ └── libbianbuai.so.1.0.15└── share └── ai-support // 预置资源数据 ├── imgs ├── models └── videos16 directories, 24 files
6.2.1.2 Demo 编译
交叉编译
交叉编译主要适用于 PC 端(e.g. x86_64 开发环境),流程(示例)如下:
# 指定 spacemit-ai-sdk 路径$ SDK=${PATH_TO_SPACEMIT_AI_SDK} # e.g. /opt/spacemit-ai-sdk.v1.1.0# 指定交叉编译相关环境变量$ CROSS_TOOL=$SDK/spacemit-gcc/bin/riscv64-unknown-linux-gnu-$ SYSROOT=$SDK/spacemit-gcc/sysroot$ BIANBUAI_HOME=$SDK/bianbu-ai-support$ ORT_HOME=$SDK/spacemit-ort$ OPENCV_DIR=$SDK/bianbu-ai-support/lib/3rdparty/opencv4/lib/cmake/opencv4# 创建 cmake 工作目录并编译 demo$ cd ${BIANBUAI_HOME}/demo$ mkdir build && pushd build$ cmake .. -DBIANBUAI_HOME=${BIANBUAI_HOME} -DORT_HOME=${ORT_HOME} -DOpenCV_DIR=${OPENCV_DIR} -DCMAKE_C_COMPILER=${CROSS_TOOL}gcc -DCMAKE_CXX_COMPILER=${CROSS_TOOL}g++ -DCMAKE_SYSROOT=${SYSROOT}$ make -j4$ popd
本地编译
本地编译适用于 芯片端,流程(示例)如下:
# 指定本地编译相关环境变量$ CROSS_TOOL=$ SYSROOT=$ BIANBUAI_HOME=$SDK/bianbu-ai-support # 指定最新 sdk 中的版本或 /usr 目录$ ORT_HOME=$SDK/spacemit-ort # 指定最新 sdk 中的版本或 /usr 目录$ OPENCV_DIR= # 指定最新 sdk 中的版本或通过 find_package 自动查找# 创建 cmake 工作目录并编译 demo$ cd ${BIANBUAI_HOME}/demo$ mkdir build && pushd build$ cmake .. -DBIANBUAI_HOME=${BIANBUAI_HOME} -DORT_HOME=${ORT_HOME} -DOpenCV_DIR=${OPENCV_DIR} -DCMAKE_C_COMPILER=${CROSS_TOOL}gcc -DCMAKE_CXX_COMPILER=${CROSS_TOOL}g++ -DCMAKE_SYSROOT=${SYSROOT}$ make -j4$ popd
【提示】上述相关内容已提前预置在 demo/build.sh 快速编译脚本中。您可以通过编辑 demo/build.sh 脚本,快速修改相关配置(如:ORT_HOME 等变量)。届时,您可以通过 bash build.sh(交叉编译)和 bash build.sh --native(本地编译)命令快速验证 demo 编译。
快速编译
# 一键交叉编译(e.g. spacemit-ai-sdk.v1.1.0 docker 环境)$ cd /opt/spacemit-ai-sdk.v1.1.0/bianbu-ai-support/demo$ bash build.sh
6.2.1.3 Demo 运行
对于交叉编译后的 demo 程序,您可以使用部署工具中预置的 qemu-riscv64 工具,实现 PC 端的仿真运行。相关配置如下:
$ QEMU_CMD="$SDK/spacemit-qemu/bin/qemu-riscv64 -L $SYSROOT"
【提示】对于本地编译后的 demo 程序,您无需配置任何环境变量。
# Create softlink to test resource if necessary$ ln -sf ${BIANBUAI_HOME}/rootfs/usr/share/ai-support data# Smoke test with image classification$ env LD_LIBRARY_PATH=${ORT_HOME}/lib:$LD_LIBRARY_PATH ${QEMU_CMD} \ build/ classification_demo data/models/squeezenet1.1-7.onnx data/labels/synset.txt data/imgs/dog.jpg# Smoke test with object detection$ env LD_LIBRARY_PATH=${ORT_HOME}/lib:$LD_LIBRARY_PATH ${QEMU_CMD} \ build/detection_demo data/models/nanodet-plus-m_320.onnx data/models/coco.txt data/imgs/person.jpg result0.jpg
【提示】上述相关内容已同样提前预置在 demo/build.sh 快速编译脚本中。您可以通过 bash build.sh --test 命令快速运行上述示例(x86_64 docker 环境仿真测试):

6.2.1.4 Demo 说明
单张图片图像分类 demo,输入单张图片路径,输出图像的类别。
运行方法
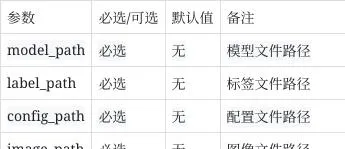
$ classification_demo Usage: classification_demo <model_path> <label_path> <image_path> classification_demo <config_path> <image_path>
参数说明
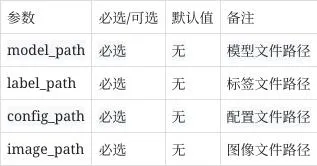
单张图片目标检测 demo,输入单张图片地址与保存图片地址,输出框信息并将画框后图片保存到目标图片位置。
运行方法
$ detection_demo Usage: detection_demo <model_path> <label_path> <image_path> <save_path>detection_demo <config_path> <image_path> <save_path>
参数说明
视频流目标检测 demo,可以输入视频文件或者接入摄像头并实时显示画框后的画面。
运行方法
$ detection_stream_demo Usage: detection_stream_demo [-h <resize_height>] [-w <resize_width>] [-f] <model_path> <label_path> <input>detection_stream_demo [-h <resize_height>] [-w <resize_width>] [-f] <config_path> <input>
参数说明

视频目标检测 demo,输入视频文件地址,会输出实时框信息并保存画框后的视频(avi 格式)到目标地址。
运行方法
$ detection_video_demo Usage: detection_video_demo <model_path> <label_path> <video_path> <save_path>(*.avi)detection_video_demo <config_path> <video_path> <save_path>(*.avi)
参数说明

单张图片姿态估计 demo,输入单张图片地址与保存图片地址,将画点后图片保存到目标图片位置。
运行方法
$ estimation_demo Usage: estimation_demo <detection_model_path> <detection_label_path> <pose_point_model_path> <image_path> <save_path>estimation_demo <detection_config_path> <pose_point_config_path> <image_path> <save_path>
参数说明

视频流姿态追踪 demo,可以输入视频文件或者接入摄像头并实时显示画框后的画面。
运行方法
$ tracker_stream_demo Usage: tracker_stream_demo [-h <resize_height>] [-w <resize_width>] [-f] <detection_model_path> <detection_label_path> <pose_point_model_path> <input>tracker_stream_demo [-h <resize_height>] [-w <resize_width>] [-f] <detection_config_path> <pose_point_config_path> <input>
参数说明

6.2.1.5 环境变量说明

6.2.2 AI Engine
6.2.2.1 简介
SpacemiT-ORT 包含 ONNXRuntime 基础推理框架(v1.15.1)与 SpaceMITExecutionProvider 加速后端(后简称 EP),其使用方法与公版 ONNXRuntime 几乎一致。
6.2.2.2 QuickStart
#include <onnxruntime_cxx_api.h>#include "spacemit_ort_env.h"Ort::Env env(ORT_LOGGING_LEVEL_WARNING, "ort-demo");Ort::SessionOptions session_options;// 设置推理线程数//int64_t num_threads = 2;//session_options.SetIntraOpNumThreads(num_threads);std::unordered_map<std::string, std::string> provider_options;// provider_options["SPACEMIT_EP_DISABLE_OP_TYPE_FILTER"] = "OPA;OPB;OPC"; 禁止EP推理某些OP类型, node.op// provider_options["SPACEMIT_EP_DISABLE_OP_NAME_FILTER"] = "OPA;OPB;OPC"; 禁止EP推理某些命名的OP, node.nameSessionOptionsSpaceMITEnvInit(session_options, provider_options); // 可选加载SpaceMIT环境初始化Ort::Session session(env, net_param_path, session_options);// ...后续与公版ORT一致
# 使用whl包安装# pip install spacemit_ort-*.whl# 在riscv64平台上如果遇到警告则加上--break-system-packages# whl包剥离了依赖库的自动安装, 需要自行安装numpy# 对于riscv64平台,使用命令apt install python3-numpy安装import onnxruntime as ortimport numpy as npimport spacemit_orteps = ort.get_available_providers() #net_param_path = "resnet18.q.onnx"sess_options = ort.SessionOptions()# 设置线程数# sess_options.intra_op_num_threads = 2# 设置log等级# sess_options.log_severity_level = 1# 带ep的sessionsession = ort.InferenceSession(net_param_path, sess_options, providers=["SpaceMITExecutionProvider"])# 不带ep的session# 因为存在2个EP,因此需要特别指定ref_session = ort.InferenceSession(net_param_path, sess_options, providers=["CPUExecutionProvider"])input_tensor = np.ones((1, 3, 224, 224), dtype=np.float32)input_name = session.get_inputs()[0].name output_names = [output.name for output in session.get_outputs()] outputs = session.run(output_names, {input_name: input_tensor})ref_outputs = ref_session.run(output_names, {input_name: input_tensor})# outputs与ref_outputs的误差一般在1e-5以内
6.2.2.3 Custom Operators plugins
使用原生 onnxruntime 的扩展自定义算子的方式,原文可参考
https://onnxruntime.ai/docs/reference/operators/add-custom-op.html
#include "onnxruntime_cxx_api.h"struct CustomKernel { CustomKernel (const OrtKernelInfo* info); void Compute(OrtKernelContext* context);};struct CustomOp : Ort::CustomOpBase<CustomOp, CustomKernel> { explicit CustomOp (); void* CreateKernel(const OrtApi&, const OrtKernelInfo*) const; const char* GetName() const { return "custom op"; }; const char* GetExecutionProviderType() const { return "CPUExecutionProvider"; }; size_t GetInputTypeCount() const { return 1; }; ONNXTensorElementDataType GetInputType(size_t) const { return ONNX_TENSOR_ELEMENT_DATA_TYPE_UNDEFINED; }; OrtCustomOpInputOutputCharacteristic GetInputCharacteristic(size_t) const { return OrtCustomOpInputOutputCharacteristic::INPUT_OUTPUT_OPTIONAL; }; size_t GetOutputTypeCount() const { return 1; }; ONNXTensorElementDataType GetOutputType(size_t) const { return ONNX_TENSOR_ELEMENT_DATA_TYPE_UNDEFINED; }; OrtCustomOpInputOutputCharacteristic GetOutputCharacteristic(size_t) const { return OrtCustomOpInputOutputCharacteristic::INPUT_OUTPUT_OPTIONAL; };};// 声明自定义算子域并向session_options增加自定义算子static const char* c_OpDomain = "user.custom_domain";Ort::CustomOpDomain domain{c_OpDomain};static TestCustomOp CustomOp;domain.Add(&TestCustomOp());session_options.Add(domain);
6.2.2.4 Operator Accelerate List

6.2.2.5 Inference Sample
为了使用户更加容易上手,我们提供了相应的推理 Sample。
可见 SDK 包中,spacemit-ort/samples 路径。
6.3 常见问题(FAQ)
欢迎大家踊跃提问
6.3.1 如何查看模型推理的 profiling 信息?
可以参考原版说明。
https://onnxruntime.ai/docs/performance/tune-performance/profiling-tools.html
#include <onnxruntime_cxx_api.h>#include "spacemit_ort_env.h"Ort::Env env(ORT_LOGGING_LEVEL_WARNING, "ort-demo");Ort::SessionOptions session_options;std::unordered_map<std::string, std::string> provider_options;std::string profile_path = "ort-demo-profile";// 开启profilingsession_options.EnableProfiling(profile_path.c_str());std::string opt_net_path = "ort-demo-opt.onnx";// 开启保存优化后ONNX模型,该模型只能在当前特定平台下使用session_options.SetOptimizedModelFilePath(opt_net_path.c_str());SessionOptionsSpaceMITEnvInit(session_options, provider_options);Ort::Session session(env, net_param_path, session_options);
6.3.2 如何保存模型运行时逐层结果?
ONNX 模型节点输出 Tensor 的 dump 功能,由一系列环境变量控制,此处给出可能使用到的常用环境变量解释。

export ORT_DEBUG_NODE_IO_DUMP_SHAPE_DATA=1export ORT_DEBUG_NODE_IO_DUMP_OUTPUT_DATA=1export ORT_DEBUG_NODE_IO_DUMP_DATA_DESTINATION=files# 指定导出Tensor文件的目录export ORT_DEBUG_NODE_IO_OUTPUT_DIR=./dump_direxport ORT_DEBUG_NODE_IO_DUMPING_DATA_TO_FILES_FOR_ALL_NODES_IS_OK=1export ORT_DEBUG_NODE_IO_DUMP_NODE_PLACEMENT=1export ORT_DEBUG_NODE_IO_APPEND_RANK_TO_FILE_NAME=1# export ORT_DEBUG_NODE_IO_OP_TYPE_FILTER="QLinearConv;QLinearGlobalAveragePool"rm -rf ./dump_dirmkdir -p ./dump_dir# 执行demo或者你的程序获得./run_demo resnet18 resnet18.q.onnx
QLinearConv node: SpaceMITExecutionProvider_QLinearConv_20Input 0 Name: PPQ_Operation_141 Shape: {1,7,7,512}Input 1 Name: ortshared_1_0_1_2_token_254 Shape: {}Input 2 Name: PPQ_Variable_373 Shape: {}Input 3 Name: onnx::Conv_250 Shape: {512,512,3,3}Input 4 Name: PPQ_Variable_375 Shape: {512}Input 5 Name: PPQ_Variable_376 Shape: {512}Input 6 Name: ortshared_1_0_1_3_token_255 Shape: {}Input 7 Name: PPQ_Variable_382 Shape: {}Input 8 Name: onnx::Conv_251 was missing data type Placement: SpaceMITExecutionProvider-----------Output 0 Name: PPQ_Operation_145 Shape: {1,7,7,512} Placement: SpaceMITExecutionProvider-----------QLinearGlobalAveragePool node: SpaceMITExecutionProvider_QLinearGlobalAveragePool_21Input 0 Name: PPQ_Operation_147 Shape: {1,7,7,512}Input 1 Name: ortshared_1_0_1_0_token_252 Shape: {}Input 2 Name: PPQ_Variable_391 Shape: {}Input 3 Name: ortshared_1_0_1_1_token_253 Shape: {}Input 4 Name: PPQ_Variable_394 Shape: {} Placement: SpaceMITExecutionProvider-----------Output 0 Name: PPQ_Operation_149 Shape: {1,1,1,512}
在 ./dump_dir 目录中获得指定节点类型的所有输出,以 tensorproto 格式存放

6.3.3 如何设置多线程以及多线程亲和性?
可参考原版文档设置线程亲和性,因为架构特殊性,0~3 号线程无法手动设置亲和性,由 ep 自行管理。
https://onnxruntime.ai/docs/performance/tune-performance/threading.html#set-intra-op-thread-affinity
6.3.4 是否需要关注 Tensor 的 Layout 内存排布?
推理库完全沿用 ONNXRuntime 对于 Tensor 的定义,即 NCHW 与 shape 描述一致的内存布局。
6.3.5 输入 QLinear 算子的模型
ONNX 算子集合内有一些公版的 QLinear 算子,在静态 shape 的情况下,可以直接使用,而在其他情况下,尽量使用 QDQ 格式的量化模型
7. Model Zoo
本章节主要介绍进迭时空 Model Zoo 相关内容。
7.1 模型列表
classification

Detection

Pose


