一、前面的話
本文主要的內容是幫助讀者朋友梳理chrome外掛程式的tabs能力,如果您是第一次閱讀本文,也建議您在閱讀完本文後,嘗試看看我下面的這些系列文章,它們可以更好的幫您認識和了解chrome外掛程式:
1.能力
一款瀏覽器外掛程式具備非常強大的能力,它不僅可以向當前所有的站點裏註入指令碼,對網站的功能進行擴充套件。更重要的是它還可以和瀏覽器的 標簽系統 進行互動,從而建立、修改、管理每一個tab,而這一切都基於外掛程式系統為我們提供的 tabs相關的API ,chrome不僅提供了我們用於操作和管理tabs的API,而且還提供了和 content 指令碼之間的通訊方法。
溫馨提示:
Tabs API 只能在background指令碼中以及option指令碼、popup指令碼、由chrome建立的tab中存取到,在content指令碼中是無法訪使用的。
換句話說,chrome有選擇性的給不同的指令碼環境註入了不同的chrome物件,導致提供的API具備差異性。
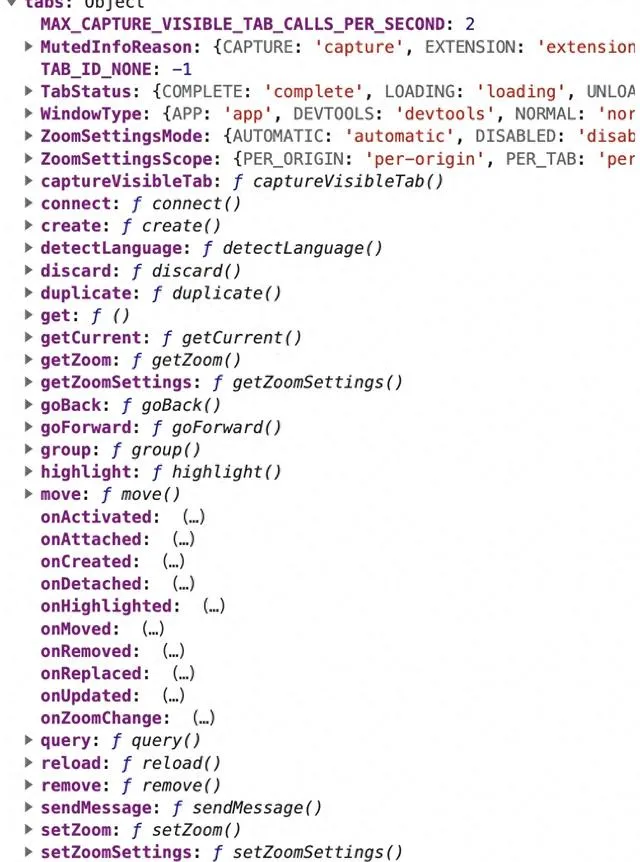
該圖是我們在特定環境下可以透過chrome.tabs存取的所有的api,這些就是chrome為我們內建的提供給開發者的 能力
2.許可權
在之前的文章中我們提到過,如果要使用某些特別的API,我們需要在外掛程式配置檔 manifest.json 中配置相應的 許可權聲明 ,但幸運的是對於tabs相關的部份API不需要在manifest.json中顯式的配置「tabs」就可以直接使用。比如說: 建立一個新的tab,重新載入某個tab,或者導航到另外一個URL等等。
但是下面的這些API在使用的時候,則需要加上相關的配置才可以使用,比如說:
chrome.tabs. executeScript () // 註入一段指令碼並執行
chrome.tabs. insertCss () // 註入一段css樣式
chrome.tabs. removeCss () // 移除一段css樣式
{
// manifest.json "host_permissions":[ "<all_urls>" ] // 支持正則匹配正則
}
二、API
接下來我們一一透過案例來認識他們,從而感受每一個API的具體行為以及他們的使用條件、註意事項等等。
1. 建立
我們可以透過這個API來建立一個新的tab,這個tab和普通的站點不一樣,屬於外掛程式所屬的頁面,因此支持跨域請求、獲取更多的chrome提供的方法。
// background.js
chrome.runtime.onInstalled. addListener (({reason}) => {
if (reason === 'install' ) {
chrome.tabs. create ({
url: "newtab.html" // 相對於background指令碼的路徑下需要有一個newtab.html檔
});
}
});
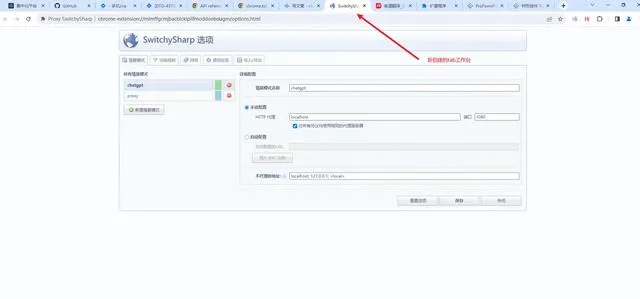
上面的指令碼意味著在外掛程式第一次安裝完成之後,就會立馬建立一個新的分頁,所以如果我們想要在任何時候建立一個新的tab,就可以使用這個API,行業內很多外掛程式的工作台都是建立一個新的tab頁進行工作的,比如著名的代理外掛程式 SwitchySharp
該api預設支持,不需要額外的manifest配置
2. 尋找
我們可能有這樣的需要,獲取當前瀏覽器視窗處於啟用狀態的tab頁面,因為對於同一個視窗,有且只有會一個tab是展示在使用者面前的,我們把這樣的tab稱為啟用狀態,這個時候我們就需要用到下面的api。
async function getCurrentTab () { let queryOptions = { active: true }; let [tab] = await chrome.tabs. query (queryOptions); return tab; }
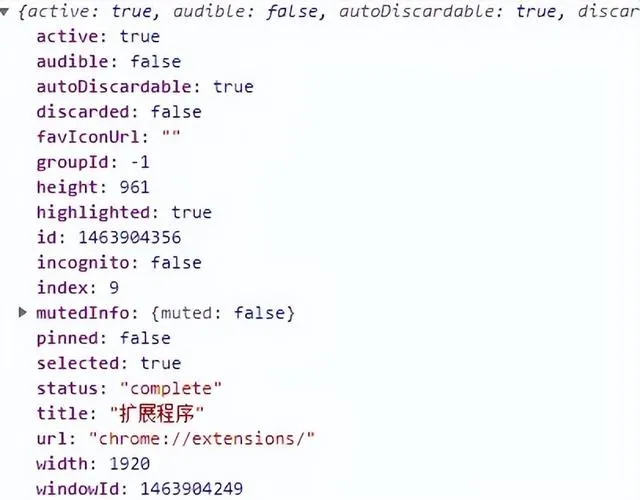
呼叫上面的方法,你就可以獲得當前視窗啟用的那個tab的例項物件了,從這個物件中,你可以獲取到對應的tab唯一的id、url、圖示等資訊。
值得註意的是,如果chrome瀏覽器開啟了多個視窗,就意味著可能每一個視窗都會存在一個啟用的tab,因此我們獲取的tab就會是多個,這個時候如果只是解構出第一個可能是不夠嚴謹的。
因此我們可以透過添加搜尋條件來精確的尋找:
async function getCurrentTab () {
let queryOptions = {
active: true , currentWindow: true
};
let [tab] = await
chrome.tabs. query (queryOptions);
return tab;
}
透過添加一個參數 currentWindow ,意味著只搜尋指令碼執行所在視窗的啟用的tab,這個時候肯定只會尋找出唯一的一個tab,解構第一個就不會有問題。
搜尋條件除了上述之外,還有下面可以選擇:
|
參數 |
型別 |
作用 |
|
active |
boolean |
是否處於啟用狀態 |
|
audible |
boolean |
是否處於播放音訊狀態 |
|
currentWindow |
boolean |
是否處於指令碼所在視窗內 |
|
groupId |
number |
是否處於某個分組內 |
|
highlighted |
boolean |
是否處於高亮狀態 |
|
index |
number |
視窗從左往右第index個tab |
|
pinned |
boolean |
是否處於被固定的狀態 |
|
status |
unloaded/loading/complete |
匹配tab的status為該status的tabs |
|
title |
string |
匹配tab的title為該title的tabs |
|
url |
string |
匹配tab的url為該url的tabs |
|
windowId |
number |
特定視窗下的tabs |
|
windowType |
normal/popup/panel/app/devtools |
特定的視窗型別下所在的tabs |
被固定是指那些透過右鍵點選tab的時候,選擇固定在最左側的標簽,並且可以固定多個。
該api預設支持,需要額外的manifest配置,需要顯式聲明「tabs」的permissions
3.發送訊息
我們可以很方便的給指定的tab發送訊息,一般來說我們可以在content指令碼中做訊息的監聽,接收到訊息後使其執行不同的業務邏輯。
chrome.tabs. sendMessage (
tabId: number, // 目標tab的id
message: any, // 發送資訊
options?: object, // 其他配置項
callback?: function , // 回呼函式 )
上面這個是V3版本的外掛程式使用的,在V2版本中我們使用chrome.tabs.sendRquest()
// 在v3版本中已廢棄
chrome.tabs. sendRequest (
tabId: number, // 目標tab的id
request: any, // 發送資訊
callback?: function , // 回呼函式
)
4.修改
如果我們希望修改一個tab的一些參數資訊,我們可以選擇使用下面這個API:
chrome.tabs. update ( tabId?: number, updateProperties: object, callback?: function , )
其中updateProperties的值就是上面提到的queryOptions的內容保持一致,例如我們可以動態的更改指定tab的title、url、pinned等狀態內容!
5.縮放比
當我們按住ctrl的同時再滑動滑鼠滾輪的話就可以調整頁面的縮放比例,這個可能大家平時都深有體會,但是實際上這個也可以透過外掛程式給我們提供的API來動態的進行調整:
chrome.tabs. setZoom ( tabId?: number, zoomFactor: number, // 縮放比例 callback?: function , )
6.移動/移除/重新整理
我們介紹的第一個API就展示了如何建立一個新的tab,他會預設建立在最末尾,也就是最右側,如果這個放置位置我們不滿意,我們也可以將其放置在我們想要的位置。
移動
chrome.tabs. move (
tabIds: number | number [],
moveProperties: object ,
callback?: function ,
)
type moveProperties = { index?: number , // 想要移動至的index索引位置. `-1` 移動至視窗末尾.
windowId?: number // 移動至的視窗id
}
移除
chrome.tabs. remove ( tabIds: number | number[], callback?: function , )
重新整理
chrome.tabs. reload ( tabId?: number , reloadProperties?: object , callback?: function , ) type reloadProperties = { bypassCache?: boolean // 是否繞過本地緩存 預設不繞過,也就是使用本地緩存。 }
7.導航
我們可以透過外掛程式來控制一個tab的前進後退(如果他們都曾有過跳轉的記錄)
chrome.tabs. goBack ( // 回到最近的一次歷史記錄 tabId?: number , callback?: function , ) chrome.tabs. goForward ( // 去到下一個歷史記錄,如果有的話 tabId?: number , callback?: function , )
8.丟棄/復制
當我們的tab開的特別多的時候,瀏覽器會有個小最佳化,對於某些長時間不用的tab,瀏覽器會清空記憶體中對其的狀態存貯,因此當我們再次將其啟用時會重新載入!這個過程外掛程式也提供了API可以幫助我們做到:
chrome.tabs. discard ( tabId?: number , callback?: function , ) chrome.tabs. duplicate ( // 這個API與discard相反,可以幫助我們復制一個一摸一樣的tab標簽 tabId: number , callback?: function , )
9.分組
如果我們希望將某些具備相似特征的網站分成一個組,使其能夠在檢視上更好的被察覺,那麽我們就可以透過外掛程式為我們提供的API來進行實作:
第一步:篩選出希望分到同一組的tabs
const tabs = await chrome.tabs. query ({ url: [ "https://developer.chrome.com/*" ], });
根據前面的知識,我們很容易就可以知道tabs就是網域名稱為 "developer.chrome.com" 開頭的所有站點的tab集合;
第二步:將他們分為一組
const tabIds = tabs. map (({ id }) => id); const group = await chrome.tabs. group ({ tabIds });

上圖中就可以看到所有符合條件的站點就被分為同一個組了,這個API的使用方式是:
chrome.tabs. group ( options: GroupOptions , callback?: function , ) type GroupOptions = { tabIds?: number [], // 希望被分組的tab的id的集合 groupId?: number , // 已有的分組 createProperties?:{ windowId?: number // 希望分組被建立在那個視窗, 預設是指令碼所在視窗 } }
額外的話:
如果我們希望在分組上再加上一個樣式或者字樣作為標記的話,也可以這樣做:
// 第一步: 在manifest.json中添加「tabGrpups」的許可權 { ... "permissions":[ "tabGroups" ] } //第二步: chrome.tabGroups.update(group, { title: "這是分組1" , color:'red' });
就可以修改這個分組的一些特征,上面是增加了一個標題,效果如下:
三、實戰
以上我們介紹了基本的API,接下來我們透過一些案例來實際感受一下每個API的作用:
準備以下的計畫:
manifest.json
{
"name": "tabs demo" ,
"description": "tabs demo" ,
"version": "1.0" ,
"manifest_version": 3 ,
"action": {
"default_popup": "popup.html" ,
"default_icon":
{
"16": "/images/get_started16.png" ,
"32": "/images/get_started32.png" ,
"48": "/images/get_started48.png" ,
"128": "/images/get_started128.png"
}
},
"content_scripts": [
{
"js": [ "content.js" ],
"matches": [ "<all_urls>" ] } ],
"background":
{
"service_worker": "background.js"
},
"icons": {
"16": "/images/get_started16.png" ,
"32": "/images/get_started32.png" ,
"48": "/images/get_started48.png" ,
"128": "/images/get_started128.png"
},
"permissions": [ "tabs" , "tabGroups" ] }
content.js / background.js
// content.js let color = "" ; console . log ( "content.js" ); chrome.runtime.onMessage. addListener ((message, sender, sendResponse) => { color = document .body. style.color; document .body. style.background = message; sendResponse ( "changed" ); }); // background.js console . log (chrome);
newtab.html
<!DOCTYPE html > <html lang = "en" > <head> <meta charset = "UTF-8" /> <meta name = "viewport" content = "width=device-width, initial-scale=1.0" /> <title> chrome外掛程式 </title> </head> <body> <p> 我是一個由chrome外掛程式建立的頁面 </p> </body> </html>
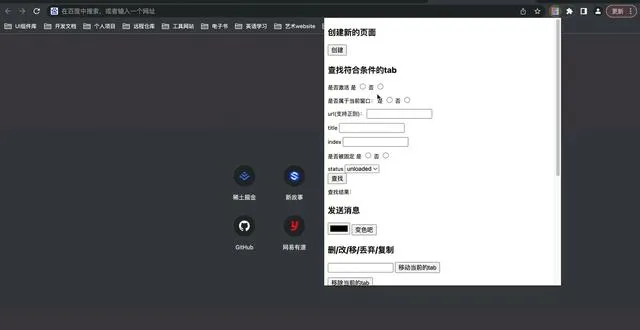
popup.html
<!DOCTYPE html > <html lang = "en" > <head> <meta charset = "UTF-8" /> <meta name = "viewport" content = "width=device-width, initial-scale=1.0" /> <title> Document </title> </head> <body> <p> <p> 建立新的頁面 </p> <button id = "create-tab" >建立 </button> </p> <p> <p> 尋找符合條件的tab </p> <div> <span> 是否啟用 </span> <span> 是 </span> <input type = "radio" name = "isActive" value = "1" /> <span> 否 </span> <input type = "radio" name = "isActive" value = "0" /> </div> <div> <span> 是否屬於當前視窗: </span> <span> 是 </span> <input type = "radio" name = "isCurrentWindow" value = "1" /> <span> 否 </span> <input type = "radio" name = "isCurrentWindow" value = "0" /> </div> <div> <span> url(支持正則): </span> <input type = "text" id = "url" /> </div> <div> <span> title </span> <input type = "text" id = "title" /> </div> <div> <span> index </span> <input type = "text" id = "index" /> </div> <div> <span> 是否被固定 </span> <span> 是 </span> <input type = "radio" name = "pinned" value = "1" /> <span> 否 </span> <input type = "radio" name = "pinned" value = "0" /> </div> <div> <span> status </span> <select name = "status" id = "status" > <option value = "unloaded" >unloaded </option> <option value = "loading" >unloaded </option> <option value = "complete" >unloaded </option> </select> </div> <button id = "query-tab" >尋找 </button> <div> <div> 尋找結果: </div> <div id = "search-result" > </div> </div> </p> <p> <p> 發送訊息 </p> <input type = "color" id = "send-value" /> <button id = "send-btn" >變色吧 </button> </p> <p> <p> 刪/改/移/丟棄/復制 </p> <div> <input type = "text" id = "move-index" /> <button id = "move" >移動當前的tab </button> </div> <div> <button id = "remove" >移除當前的tab </button> </div> <div> <button id = "reload" >重新整理當前的tab </button> </div> <div> <input type = "text" id = "discard-value" /> <button id = "discard" >丟棄 </button> </div> <div> <button id = "duplicate" >復制 </button> </div> <div> <input type = "text" id = "update-value" /> <button id = "update" >更新 </button> </div> </p> <p> <p> 縮放比 </p> <div> <input type = "text" id = "zoom" /> <button id = "zoom-btn" >調整 </button> </div> </p> <p> <p> 分組 </p> <div> <input type = "text" id = "group-title" /> <button id = "group" >使用查詢的結果進行分組 </button> </div> </p> <p> <p> 導航 </p> <div> <button id = "goForward" >前進 </button> <button id = "goBack" >前進 </button> </div> </p> <script src = "./popup.js" > </script> </body> </html>
popup.js
document . getElementById ( "create-tab" ). addEventListener ( "click" , () => { chrome.tabs. create ({ url: "newtab.html" , // 相對於background指令碼的路徑下需要有一個newtab.html檔 }); }); let Tabs = []; const getSelect = (list) => { const yes = list[ 0 ]; const no = list[ 1 ]; if (yes.checked) { return yes.defaultValue === "1" ; } if (no.checked) { return no.defaultValue === "1" ; } return false ; }; document . getElementById ( "query-tab" ). addEventListener ( "click" , async () => { const active = getSelect ( document . getElementsByName ( "isActive" )); const currentWindow = getSelect ( document . getElementsByName ( "isCurrentWindow" ) ); const pinned = getSelect ( document . getElementsByName ( "pinned" )); const url = document . getElementById ( "url" ).value; const title = document . getElementById ( "title" ).value; const index = document . getElementById ( "index" ).value; const queryOptions = { active, currentWindow, pinned, }; if (url) { queryOptions.url = url; } if (title) { queryOptions.title = title; } if (index) { queryOptions.index = index - 0 ; } console . log (queryOptions); const tabs = await chrome.tabs. query (queryOptions); document . getElementById ( "search-result" ).innerHTML = JSON . stringify ( tabs. map (({ id }) => ({ id })) ); Tabs = tabs; }); document . getElementById ( "send-btn" ). addEventListener ( "click" , async () => { const color = document . getElementById ( "send-value" ).value; const [tab] = await chrome.tabs. query ({ active: true , currentWindow: true }); const response = await chrome.tabs. sendMessage (tab.id, color); console . log (color, response); }); const getCurrentTab = async () => { const [tab] = await chrome.tabs. query ({ active: true , currentWindow: true }); return tab.id; }; document . getElementById ( "move" ). addEventListener ( "click" , async () => { const index = document . getElementById ( "move-index" ).value - 0 ; const tabIds = await getCurrentTab (); chrome.tabs. move (tabIds, { index }); }); document . getElementById ( "remove" ). addEventListener ( "click" , async () => { const tabIds = await getCurrentTab (); chrome.tabs. remove (tabIds); }); document . getElementById ( "reload" ). addEventListener ( "click" , async () => { const tabId = await getCurrentTab (); chrome.tabs. reload (tabId); }); document . getElementById ( "discard" ). addEventListener ( "click" , async () => { const tabId = document . getElementById ( "discard-value" ).value - 0 ; chrome.tabs. discard (tabId); }); document . getElementById ( "duplicate" ). addEventListener ( "click" , async () => { const tabId = await getCurrentTab (); chrome.tabs. duplicate (tabId); }); document . getElementById ( "zoom-btn" ). addEventListener ( "click" , async () => { const tabId = await getCurrentTab (); const zoomFactor = document . getElementById ( "zoom" ).value - 0 ; chrome.tabs. setZoom (tabId, zoomFactor); }); document . getElementById ( "group" ). addEventListener ( "click" , async () => { const tabIds = Tabs . map (({ id }) => id); const title = document . getElementById ( "group-title" ).value; const group = await chrome.tabs. group ({ tabIds }); chrome.tabGroups. update (group, { color: "red" , title }); }); document . getElementById ( "goForward" ). addEventListener ( "click" , async () => { const tabId = await getCurrentTab (); chrome.tabs. goForward (tabId); }); document . getElementById ( "goBack" ). addEventListener ( "click" , async () => { const tabId = await getCurrentTab (); chrome.tabs. goBack (tabId); });
以上的資源我會放到github上,大家可以download下來直接在自己的瀏覽器上執行,檢視效果,也希望有收獲後給不吝star哈!。
下面是我原生的測試效果:
建立頁面/發送訊息
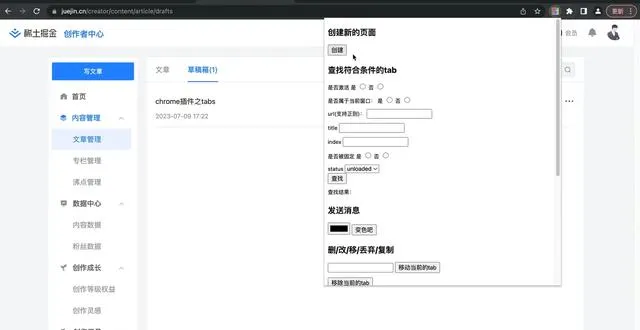
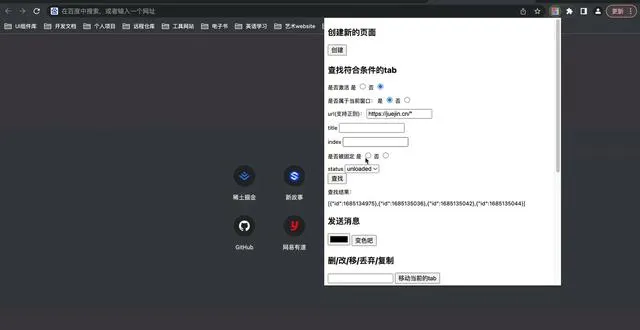
查詢
刪/改/更新
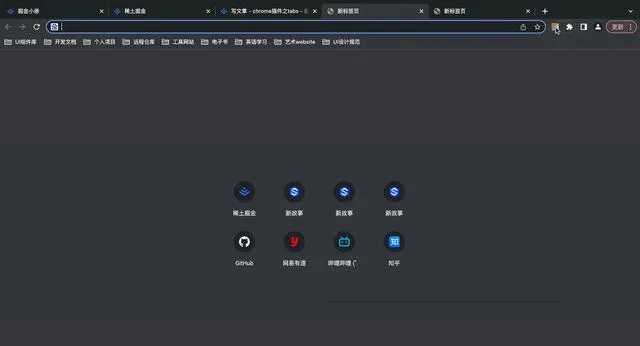
分組
有了以上的武器,就可以玩轉tabs啦!一起開始開發chrome外掛程式吧!
四、最後的話
以下是我的其他文章,歡迎閱讀
保姆級講解JS精度遺失問題(圖文結合)
shell、bash、zsh、powershell、gitbash、cmd這些到底都是啥?
從0到1開發一個瀏覽器外掛程式(通俗易懂)
用零碎時間個人建站(200+贊)
另外我有一個自己的網站,歡迎來看看 new-story.cn
創作不易,如果您覺得文章有任何幫助到您的地方,或者觸碰到了自己的知識盲區,請幫我點贊收藏一下,或者關註我,我會產出更多高品質文章,最後感謝您的閱讀,祝願大家越來越好。


